Fact file:
Matriculated: 1898
Born: 26 November 1879
Died: 21 November 1917
Regiment: Dorset Yeomanry (Queen’s Own)
Grave/Memorial: Jerusalem War Cemetery: E.56
Family background
b. 26 November 1879 in Iwerne, between Shaftesbury and Blandford Forum, North Dorset, as the fifth Henry/Harry Farr Yeatman of the family line. He was the only son (second of three children) of Commander Harry Farr Yeatman [IV], RN (Retired), JP, DL (1839–84), and Mrs Charlotte Yeatman (née Temple) (1841–1908) (m. 1876). At the time of the 1881 Census, the family was still living at Iwerne (eight servants); by the time of the 1891 Census, Yeatman’s widowed mother had moved to 14, Belvedere Road, Bath (no servants); at the time of the 1911 Census Yeatman and his sister were living at 20, Cecil Road, London, SW (one servant).
Parents and antecedents
The Yeatman family has lived in Dorset and neighbouring counties since the reign of Henry VI (1421–71; ruled 1422–61 and 1470–71) and can be traced back to John Yatteman the elder (b. c.1450). The family included a good number of clergymen in the Church of England, one of whom was the Reverend Henry Farr Yeatman [I] (1751–96), i.e. Yeatman [V]’s great-great-grandfather. He studied at Balliol College, Oxford from 1769 to 1773 and became a Fellow there in 1774. He would have had to renounce his Fellowship when he married Louisa Shuttleworth (1755–1842) in c.1784 and took up a living. He was appointed Rector of Kilve, a village in West Somerset between the Quantocks and the coast, then Vicar of St Mary’s, East Brent, Somerset, a valuable living in a village near the Bristol Channel (1791–96), and Prebendary of Wells Cathedral. His son was Henry Farr Yeatman [II] (see below), the grandfather of Harry Farr Yeatman [IV] and the great-grandfather of Yeatman [V].

Stock Gaylard Manor, Dorset.
Stock Gaylard House, a Georgian building, came into the Yeatmans’ possession when Theophila Burland (1754–1802) (née Farr) and her husband Sir John Berkeley Burland, JP, MP (1754–1804) (m. 1779), a member of an old Somerset family who had held the Manor of Steyning since the fourteenth century, died childless. Theophila was the daughter of John Farr (1725–73) and Mary Yeatman (1730–83) (m. 1779) (who was the daughter of the Bristol apothecary Morgan Yeatman (1696–1775) and Theophila Farr (1701–34), and the sister of Harry Yeatman (1724–82)). Whereupon the Stock Gaylard estate was inherited by the Reverend Harry Farr Yeatman, LL.B. [II] (1786–1861), the son of her cousin Harry Farr Yeatman [I] (see above and below).
Harry Farr Yeatman [II] was born in East Brent and studied at Balliol College, Oxford (1804–c.1808). In 1810 he married the heiress Sarah Wolcott (1790–1884) and the couple used their money to buy some of the surrounding farms and create a much larger estate, much of which still survives today. When Sarah died, the estate was left to her grandson, Commander Harry Farr Yeatman [IV], JP, DL, a retired naval officer (see below), and the father of Harry Farr Yeatman [V], but by that time it was in need of much improvement. Unfortunately, Harry Farr Yeatman [IV] died within the year; his wife Charlotte (Yeatman [V]’s mother, and the youngest daughter of William Temple, JP (1781–1875) of Bishopstrow House, near Warminster, Wiltshire, a member of the landed gentry, and his wife Fanny (1805–73) (née Stonehouse) (m. 1831)), continued the improvement of the Stock Gaylard estate. However, an agricultural slump made it difficult to increase the income from the estate, so Charlotte borrowed money in order to re-fence the deer park with iron railings, completely rebuild the church, add bathroom facilities and refurbish the kitchen. By doing so, she got into such debt that she had to be rescued from her creditors by her brother-in-law, the Right Reverend Huyshe Wolcott Yeatman-Biggs (1845–1922), a rising and influential prelate in the Church of England (see below). He retained the estate after Charlotte’s death, though he did not live there, and on his death it passed to his second son, Lewys Legge Yeatman (1879–1962; High Sheriff of Dorset 1940–41). In 1901, Bishop Yeatman-Biggs had the Lodge built at the entrance to the estate and planted the avenue of oaks that lead out into the Church Park. Lewys Legge managed to keep the estate together through the difficult inter-war period and even managed to purchase small parcels of land to consolidate the wider estate. After World War Two, when many larger estates were being dismembered, the Stock Gaylard estate survived, and when Lieutenant-Colonel John Lewys Yeatman (1911–2002) took on the estate in the late 1960s, the policy of low cost and low maintenance continued, enabling its relatively unspoilt landscape to survive today.
Harry Farr Yeatman [II] became a prominent figure in both Somerset and Dorset, where he was a Magistrate to the Assizes in Dorchester. An obituarist described him in the following expansively generous way:
a presiding magistrate, an excellent divine, an able lawyer, an accomplished scholar and university graduate, a country gentleman distinguished by his public spirit and private hospitality; a sportsman, and indeed, as master of the well-known Vale of Blackmoor Harriers [he kept his own pack and planted many fox covers and woodlands on the Stock Gaylard estate], a leader of those gallant sports and field exercises which promote more than anything else amongst the upper classes and yeomanry of England the mens sana in corpore sano – all have been removed in one who has thus devoted a long period of his busy life to promote in every way the welfare of his fellow-men. A loss such as this will be felt in so many and such varied circles of life and society; a blank of that description which of no filling up, will be found in the administrative department of the county of Dorset; a profound regret, so deep and so enduring as to be nearly without a parallel amongst us, will be created by the severance of many ties in public and in private life; that we may be pardoned if we acknowledge our entire unfitness to pronounce a suitable eulogium on the memory of the dead. The seat of justice is vacant, the heart that was ever warm to benevolence is still; the pulse of friendship and of generous sympathy has ceased to beat, and we have lost an upright judge, the poor a lavish benefactor, his equals a high-bred, noble-hearted friend.
In 1817 he published Brent Knoll, a poetic evocation of his childhood near the 450-foot-high hill of the same name that lies halfway between Weston-super-Mare and Bridgwater and overlooks East Brent. He also published on a number of contemporary topics like the Corn Laws and the Poor Law Report.
Harry Farr Yeatman [II] and Sarah had six children:
(1) Louisa Wolcott (1810–44), later Moilliet after her marriage in 1841 to Theodore Moilliet (c.1811–1886); at least two children;
(2) Harry Farr [III] (1811–52; the grandfather of Henry Farr Yeatmann [V]); married (1837) Emma Biggs (1811–73); six children.
(3) Sarah Marwood (c.1815–1906), later Meech after her marriage in 1838 to the Reverend William John Meech (1802–58);
(4) Rhoda Charleton (1819–1914), later Hext after her marriage in 1845 to Thomas Hext, JP [c.1809–1881]; at least nine children.
(5) Mary Farr (c.1822–1896), later du Boulay after her marriage in 1841 to John du Boulay, JP, DL (1811–95); at least two children;
(6) Marwood Shuttleworth, JP (c.1826–1891); married (1881) Caroline Dyson (b. c.1857 in Scotland); at least six children;
Theodore Moilliet was a merchant banker and farmer.
Harry Farr Yeatman [III] also studied at Balliol College, Oxford (1831–35), but in later life became a debtor and fled to France and Belgium. His wife Emma was the only daughter and heiress of the very successful racehorse owner and breeder Harry Biggs, DL (1766–1856), Stockton House, Stockton, Wiltshire, and his wife Margaretta Anne (née Burslem) (1783–1861). Henry and Emma’s six children are detailed below.
At the time of his death, the Reverend William John Meech was probably the Rector of St Paul’s Church, Hammoon, North Dorset, a tiny village two miles east of Sturminster Newton.
John du Boulay came from a family of French extraction.
After the death of Henry Farr Yeatman [II] in 1861, his widow Sarah lived at Stock Gaylard until her death in 1883, together with her second son, Marwood Shuttleworth Yeatman, who inherited everything at Stock Gaylard except for the house and the land. In 1881 he became High Sheriff of Dorset. At some juncture, probably on the death of his mother in 1884, Marwood and his wife Caroline acquired Holwell Manor House, Dorset, six miles south-east of Sherborne, and on moving to their new home took with them the furniture, house contents, and records from Stock Gaylard House. After Marwood died in 1891, Caroline moved to Ireland, where she may have remarried, and it is believed that many of the records pertaining to Stock Gaylard House were burnt in the garden of Holwell Manor together with other rubbish that she no longer required.

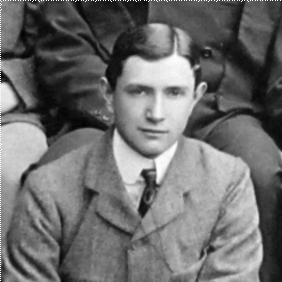
Marwood Edwards Yeatman
© Imperial War Museum HU 125329)
Marwood Shuttleworth’s son, Marwood Edwards Yeatman (1883–1914), inherited Holwell Manor House on the death of his father in 1891. But he later became a professional soldier and in 1903 he was commissioned Second Lieutenant in the 1st Battalion of the South Wales Borderers, in which he served in India for several years. On 30 April 1914 he was promoted Captain and landed with them at Le Havre on 13 August 1914 as part of 3rd Brigade in the 1st Division. Having survived the Battle of Mons, Marwood Edwards was killed in action by a sniper during the Battle of the Aisne, near Chivy-lès-Étouvelles, just south of Laon, on 15 September 1914, aged 30. He was a first cousin of Harry Farr Yeatman [IV], Yeatman’s father. He has no known grave but is commemorated on the Memorial at Ferté-sous-Jouarre. In 1909 he had married Gwladys Mary Koe (b. 1889 in Ireland, d. 1945 in Ireland) and they had two sons. After her husband’s death, Gwladys married Major Stuart Norman Charles Webb (b. c.1887 in Ireland, date of death unknown, possibly in the USA) and lived at Knocktoran House, Knocktoran, Co. Limerick.
Henry Farr Yeatman [III] and Emma’s six children were:
(1) Rhoda Marwood (c.1837 [baptized 1842], d. 1866, probably as a result of childbirth); later Nevile after her marriage in 1865 to Percy Sandford Front Nevile (b. 1840 in Switzerland, d. 1914); one son;
(2) Emma Louise (b. 1838, d. 1842 of scarlet fever);
(3) Harry Farr [IV] (1839–84); married (1876) Charlotte Temple (1841–1908); one son, two daughters;
(4) Arthur Godolphin (later Major-General, CB: see below) (1843–98);
(5) Huyshe Wolcott (see above);
(6) Emily Frances Emma (b. 1852 in Bruges, d. 1917), who became the head of an order of nuns known as the Community of Grey Ladies.
Percy Sandford Front Nevile seems to have been a man of independent means, who described himself as “Esquire” and was the son of John Pate Nevile (1814–47), a member of a family of wealthy Lancashire land-owners.
Very little is known about the naval career of Harry Farr Yeatman [IV] except that in 1861 he was the First Mate of the HMS Mersey, a wooden screw-driven frigate (1858; sold in 1875), and that by September 1872 he was a Lieutenant-Commander and the Commanding Officer of the HMS Minstrel, a screw-driven gunboat (1865; sold in 1879). In 1881 he retired to Dorset as a Commander, where he was active as a magistrate. He left £7,202 13s. 6d.
Arthur Godolphin Yeatmann-Biggs assumed the suffix Biggs under entail by Royal Licence in 1878 when he became the owner of Stockton House. At first he seemed to be destined for a career at the Bar, but in 1860, at the age of 17, he became a gentleman-cadet in the Royal Artillery and the youngest officer in the service. In 1860 he was slightly wounded at the capture of the Taku Forts by an Anglo-French army during the Second Opium War, and after that he served all over the Empire – for example in the West Indies during the 1870s. In 1874 he was promoted Captain, in 1876 Major, and in 1881 Brigade-Major of Royal Artillery in Natal and the Transvaal. He served on the Staffs of Lord Roberts and Lord Wolsley, took part in the Egyptian Campaign of 1882, and was mentioned in dispatches twice. In 1882 he was promoted Lieutenant-Colonel and in 1886 Colonel, and in 1891 he was awarded the CB. In 1894 he became the Assistant Adjutant-General in India and from 1895 he became the Commanding Officer of Presidency District, Bengal. He took part in the Tirah Expedition (October 1897–April 1898), a border war with the Afridi and Mohmand tribes for control of the Khyber Pass on the North-West Frontier of India, as the General Officer Commanding the 2nd Division under General Sir William Lockhart (1841–1900), and was present at the Battle of the Dargai Heights (18–20 October 1897). He died (unmarried) of dysentery at nearby Peshawar in 1898. He was due to be given command of the Calcutta District of the Indian Frontier Field Force.
Huyshe Wolcott Yeatman-Biggs was educated at Winchester College and Emmanuel College, Cambridge (where he was elected an Honorary Fellow in 1905). He assumed the suffix Biggs under entail by Royal Licence in 1898 when he inherited Stockton House from his brother Arthur Godolphin (see above). He was ordained in 1869 and spent six years as a curate in Salisbury before becoming the Chaplain to the Bishop of Salisbury in 1875, the year in which he married Lady Barbara Caroline Legge (c.1841–1909), the daughter of William Legge (1784–1853), the 4th Earl of Dartmouth. From 1877 to 1891 he was, successively, the Vicar of two country parishes: Netherbury (Dorset) and Sydenham (then in Kent) and from 1891 to 1905 he served as the Suffragan Bishop of Southwark; from 1905 to 1918 he was the 105th Bishop of Worcester, a see that goes back to AD 680; and he spent the last five years of his life as the Bishop of Coventry.
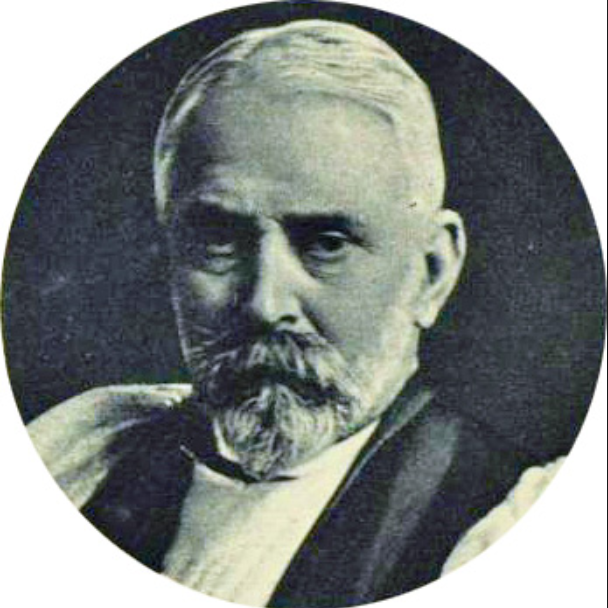
Huyshe Wolcott Yeatman-Biggs
Bishop of Coventry
Siblings and their families
Brother of:
(1) Rhoda Margaret (1876–1962), later Thompson after her marriage in 1909 to the Reverend John Alfred Thompson (1870–1941);
(2) Theophila Charlotte Wolcott (1881–1949).
John Alfred Thompson was educated at Trinity College Dublin from c.1888 to 1891 and was ordained deacon and priest in the Church of Ireland in 1892 and 1893 respectively. He then served as Curate in four parishes: from 1892 to 1895 in Gartan, Co. Donegal; from 1895 to 1896 as Curate of St John, Sligo; from 1897 to 1903 as Curate of St John, Templemichael, Slievardagh, Co. Tipperary; and in Northfield, Yorkshire from 1903 to 1907. From 1907 to 1909 he was Domestic Chaplain to the Bishop of Worcester, Huyshe Yeatman-Biggs, the uncle of Rhoda Margaret (see above). From 1909 to 1916 he was Vicar of St Thomas’s, Coventry, then spent five years as Examining Chaplain to the Bishop of Worcester (1917–18) and the Bishop of Coventry (1918–22), and from 1916 he was the Rector of the village of Richard’s Castle, just south of Ludlow, in the Diocese of Hereford, with a population of 643 and an annual stipend of £724.
Theophila never married and her last known address was The Redlands, Bishop Sutton, North-East Somerset.
Education and professional life
Yeatman attended Christ Church School, Oxford, from c.1885 to c.1890, but was probably not a Chorister; he then attended Horris Hill Preparatory School (also known as Mr Evans’s Preparatory School), Hampshire (founded 1888; cf. M.K. Mackenzie, G. Bonham-Carter, G.H. Alington, P.A. Tillard, R.H. Hine-Haycock), from c.1890 to 1893. After that he attended nearby Winchester College from 1893 to 1898, where he was a Commoner in ‘C’ House, which he represented at soccer. He also rowed and was a member of the Photographic Society. He matriculated at Magdalen as a Commoner on 19 October 1898, having passed Responsions in Hilary Term 1898. He passed the First Public Examination in Hilary Term and Trinity Term 1900 and was awarded a 3rd for his performance in Classical Moderations. In Trinity Term 1902 he was awarded a 2nd in Jurisprudence (Honours) and he took his BA on 20 November 1902. In 1904 he was awarded a 3rd in the BCL Examination. He took his BCL in 1905 and in 1906 he entered the firm of Messrs Trower, Still, Feeling and Parken, solicitors, of 5 New Square, Lincoln’s Inn, London. He later worked in the Public Trustee Office. At the time of his death his address was East Ridgeway, Northaw, Potters Bar, Hertfordshire.
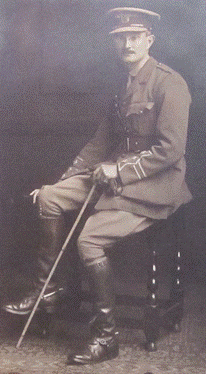
Harry Farr Yeatman, BA BCL
(Photo courtesy of Magdalen College, Oxford).
War and military service
Yeatman joined the Inns of Court Officers’ Training Corps (“The Devil’s Own”) on 6 May 1908, served with the Cavalry Squadron and became the Squadron Quartermaster Sergeant until, on 7 September 1914, he applied for a Territorial Commission. On 7 October 1914 he was commissioned Second Lieutenant (London Gazette, no. 28,932, 9 October 1914, p. 8,047) in the 1/1st (Queen’s Own) Dorset Yeomanry, a cavalry Regiment (Territorial Force) that was attached to the 1st South-Western Mounted Brigade from the beginning of the war to September 1914, when it was transferred to the 2nd South Midland Mounted Brigade as a replacement for the Oxford Yeomanry (The Queen’s Own Oxfordshire Hussars). The Brigade, which by now also included the 1/1st Royal Buckinghamshire Yeomanry and 1/1st Berkshire Yeomanry, each consisting of c.550 officers and other ranks (ORs), then became part of the 2nd Mounted Division in November 1914. On 5 December 1914, Yeatman was promoted Temporary Captain.
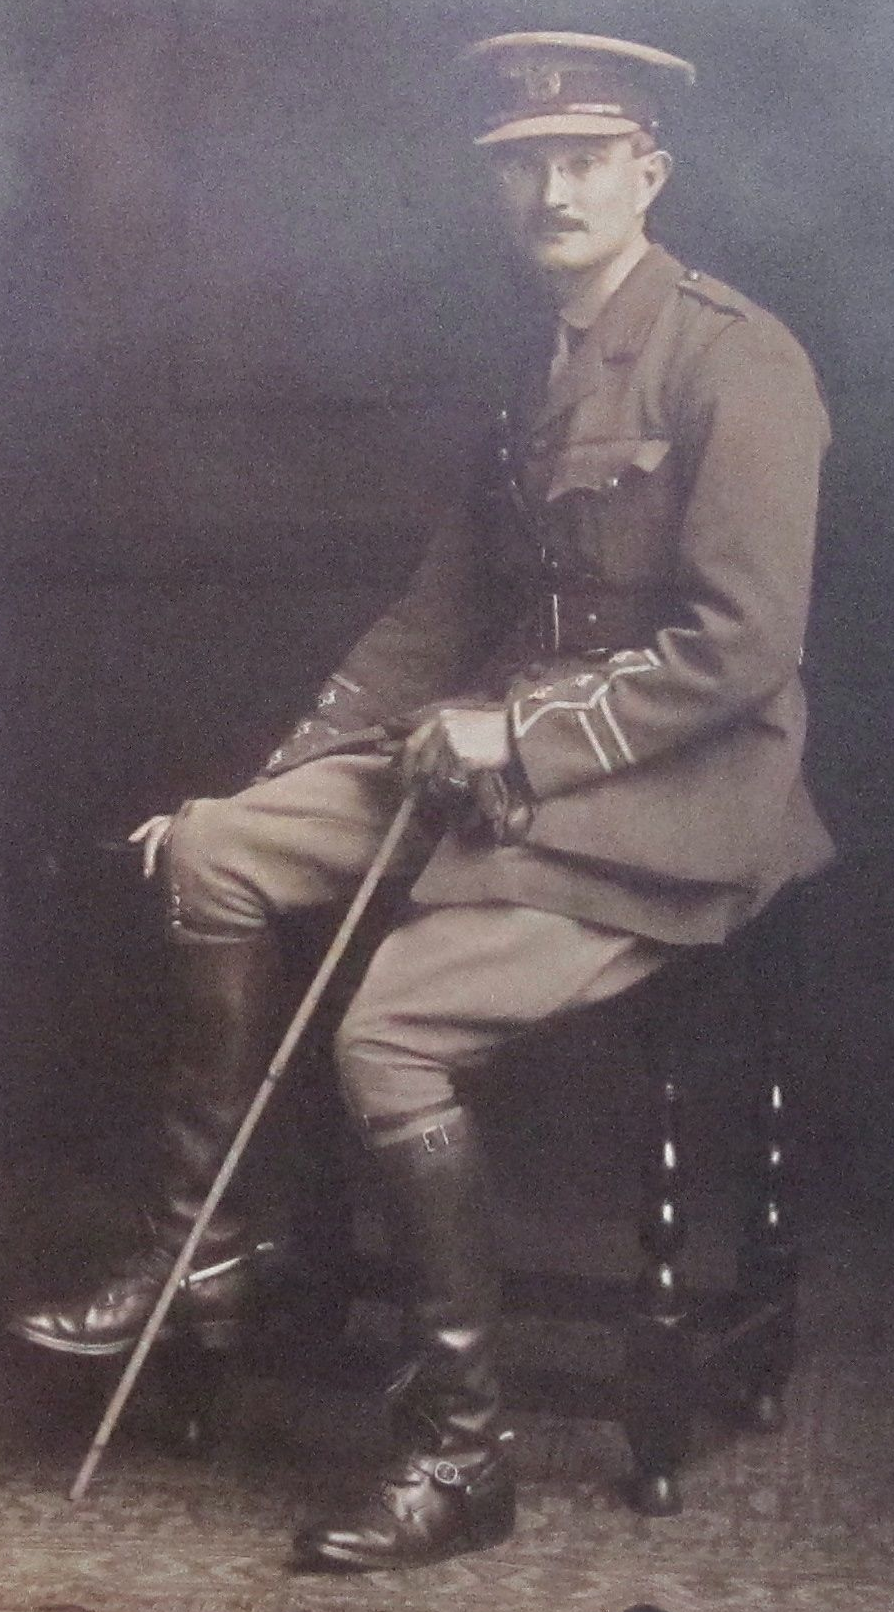
Harry Farr Yeatman, BA BCL
(Photo courtesy of Magdalen College, Oxford).
Yeatman’s Regiment trained in the Fakenham area, Norfolk, until April 1915, when the Division was shipped to Egypt and quartered in Abbassia, a suburb of Cairo. On 14 August 1915, the Regiment entrained for Alexandria, and after leaving its horses in Egypt in the care of c.100 men per Regiment, the 2nd Mounted Division, including Yeatman’s Regiment, embarked for Gallipoli. Two days later the men disembarked at the port of Mudros on the Greek island of Lemnos. It stayed there until, at dawn on 18 August 1915, it was ferried across to the Gallipoli Peninsula, where fighting had been going on between the Turks and the Allies since the invasion of 25 April 1915. The Division landed as a dismounted unit at Suvla Bay, on the north-west coast of the Gallipoli Peninsula (see the Excursus on the Reverend Arthur Groom Parham (1883–1961), attached to the article on E.F.M. Brown), in order to reinforce the troops who had landed there on 6 August 1915.
At 19.00 hours on 20 August, Yeatman’s Regiment set off with the rest of the Division to march around six miles northwards along the coastal road to Lala Baba, a hill c.158 feet high on the western side of the Gallipoli Peninsula between the southern side of Suvla Bay and the Salt Lake. At 22.00 hours the men bivouacked on the shore under the cliff and at 16.30 hours on the following day, the 2nd Midland Mounted Brigade was ordered to attack Chocolate Hill, but took very heavy casualties as they did so. The advanced lines reached the Turkish trenches on Hill 70, but after a short, sharp fight they were driven back by superior numbers to the edge of the hill and then dug in. At 03.00 hours on 22 August the Division pulled back to Chocolate Hill and dug in behind it, but when the Roll was called, it transpired that seven officers and 119 other ranks (ORs) were killed, wounded or missing. On 25 August the bivouacs at Chocolate Hill were heavily shelled all day and the men spent the two following days improving the dug-outs there. On 28 August the bivouacs were heavily shelled all day for the second time. On 30 August Yeatman’s Regiment was sent to the trenches to the north-east of Chocolate Hill and on the following day they were shelled from 06.30 to 09.30 hours. The Turks finally made their attack on 1 September, but were driven back and on 4 September the Regiment was relieved by the Dublin Fusiliers. On 5 September it moved to trenches to the east of Chocolate Hill and spent the day improving them, and it did the same every day until 13 September. It then moved into the front-line trenches and observed normal trench routine until 18 September when, at 17.00 hours, the Turks began a heavy artillery barrage but did not, as things turned out, follow it through with an attack.
The Regiment stayed in the trenches on Gallipoli until 20 October 1915, when it moved back to the trenches south of Lala Baba until 31 October 1915. By then the Regiment was down to c.32 per cent of its original strength. It marched to Lala Baba and waited to be ferried back to Lemnos on 1 November, where it stayed in the rest camp at Portianos, just west of Mudros, and where, on 17 November, it took on reinforcements from England. On 27 November 1915 it boarded the converted pre-Dreadnought battleship SS Hannibal (1896–20; modified 1905; disarmed and converted into a troop ship for service in the Mediterranean 1915; served in the East Indies and Egypt 1916–19; sold for scrap 1920) in order to be ferried to Alexandria, where it arrived on 30 November and entrained for Cairo on 1 December 1915.

HMS Hannibal while still a battleship (1896-20).
While all this was going on, Yeatman had remained in England until 16 October 1915, when he finally sailed from Devonport for Lemnos in order to join his Regiment on Gallipoli on 26 October 1915 and fill one of the gaps that had been caused by wounds or sickness. Consequently, he missed both the fierce fighting for Chocolate Hill on 21/22 August 1915, and the opportunity of getting to know Parham, who had been a part-time chaplain at Magdalen before the war and acted as the chaplain to the 2nd Mounted Brigade (inter alia) from the time of its formation until sickness forced him to leave Gallipoli for Alexandria on 23 October and return to England from there on 29 October 1915. Yeatman probably landed in Egypt on 30 November 1915 with the other survivors of his Regiment, where he was promoted from Lieutenant to Acting Captain. The depleted Regiment then stayed at the huge Allied camp at Mena, near the Pyramids at Gizeh, until 10 January 1916 when, with its complement down to 11 officers, 143 ORs, and 203 horses, it moved to the Abbassia district of Cairo, where it lived in the large barracks there from 12 to 17 January 1916.
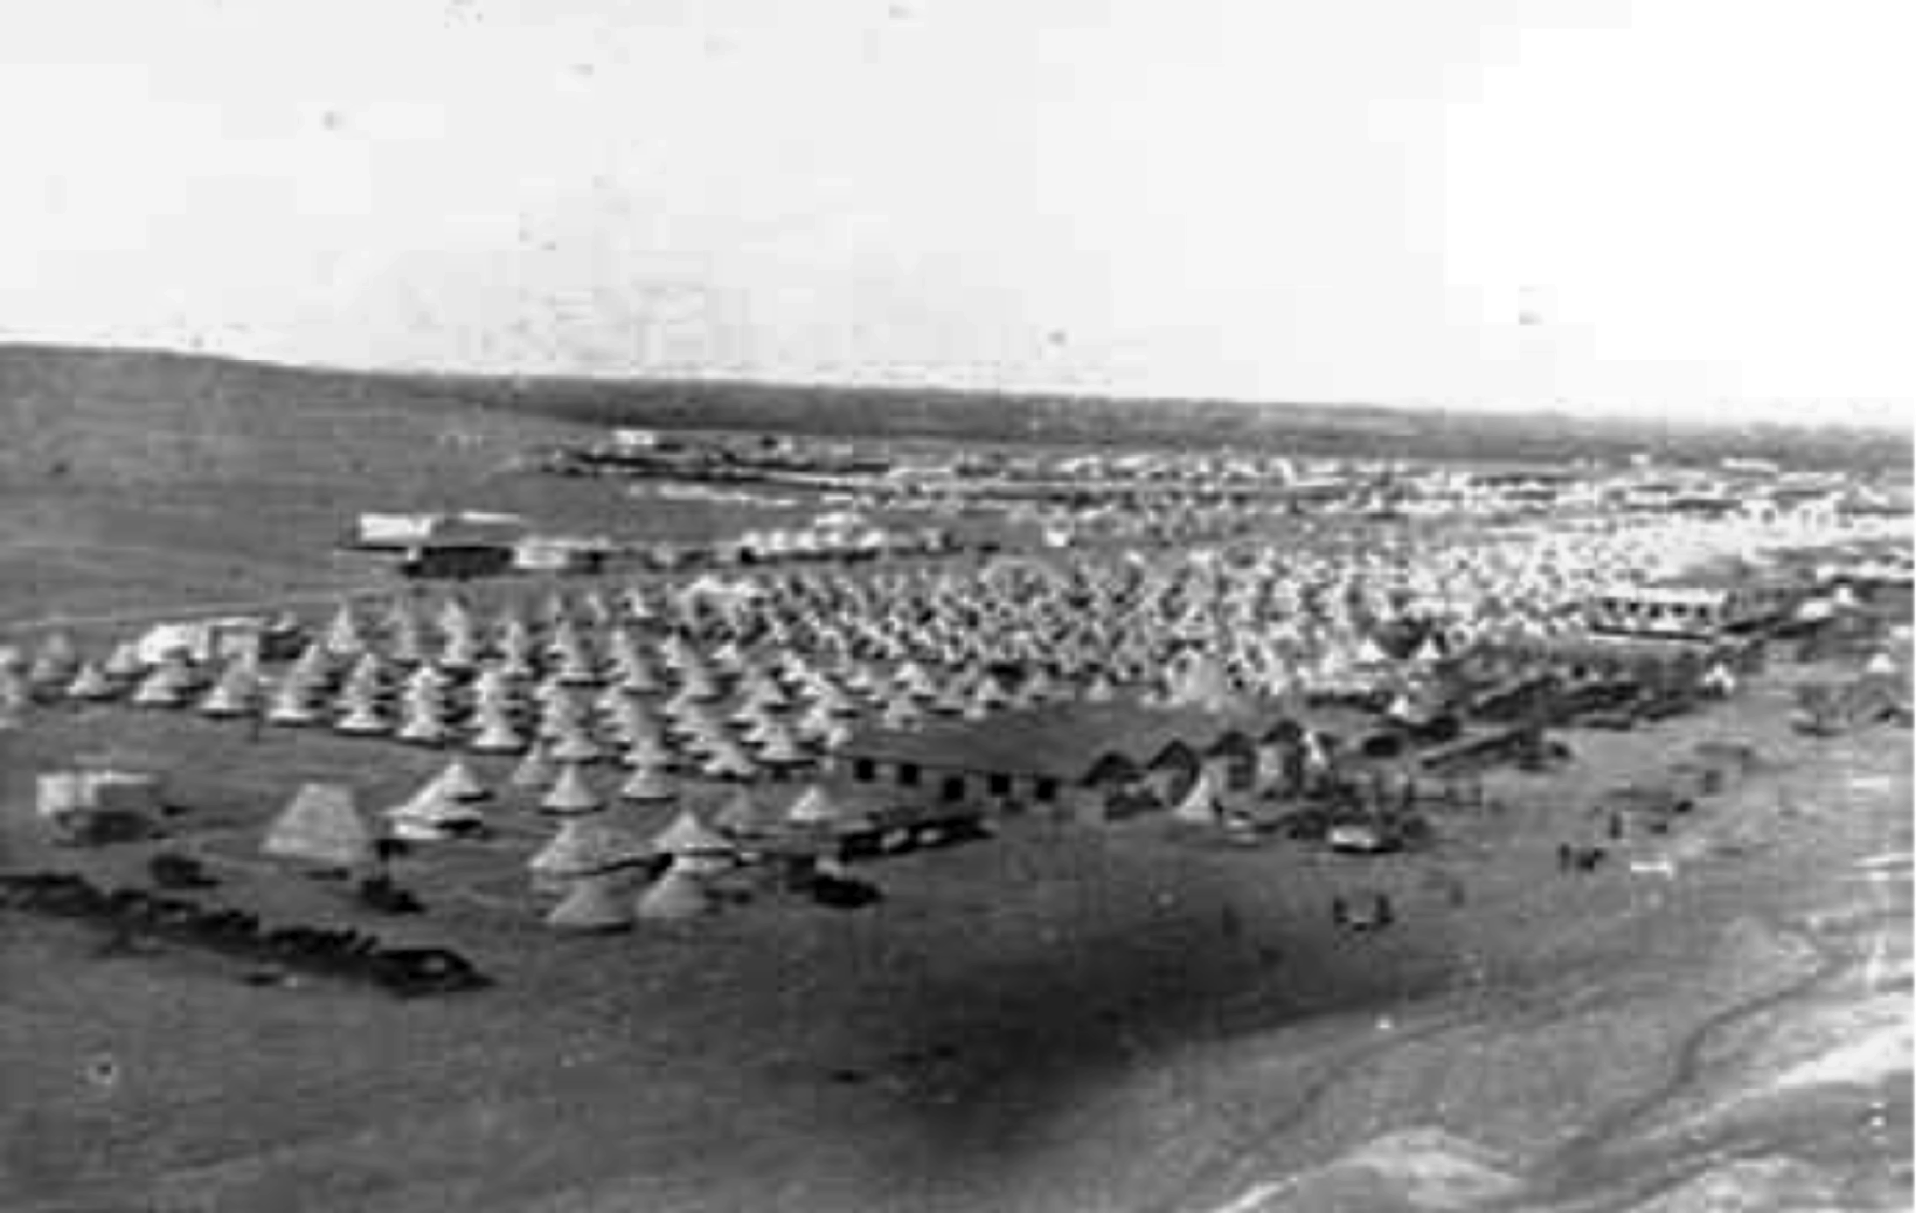
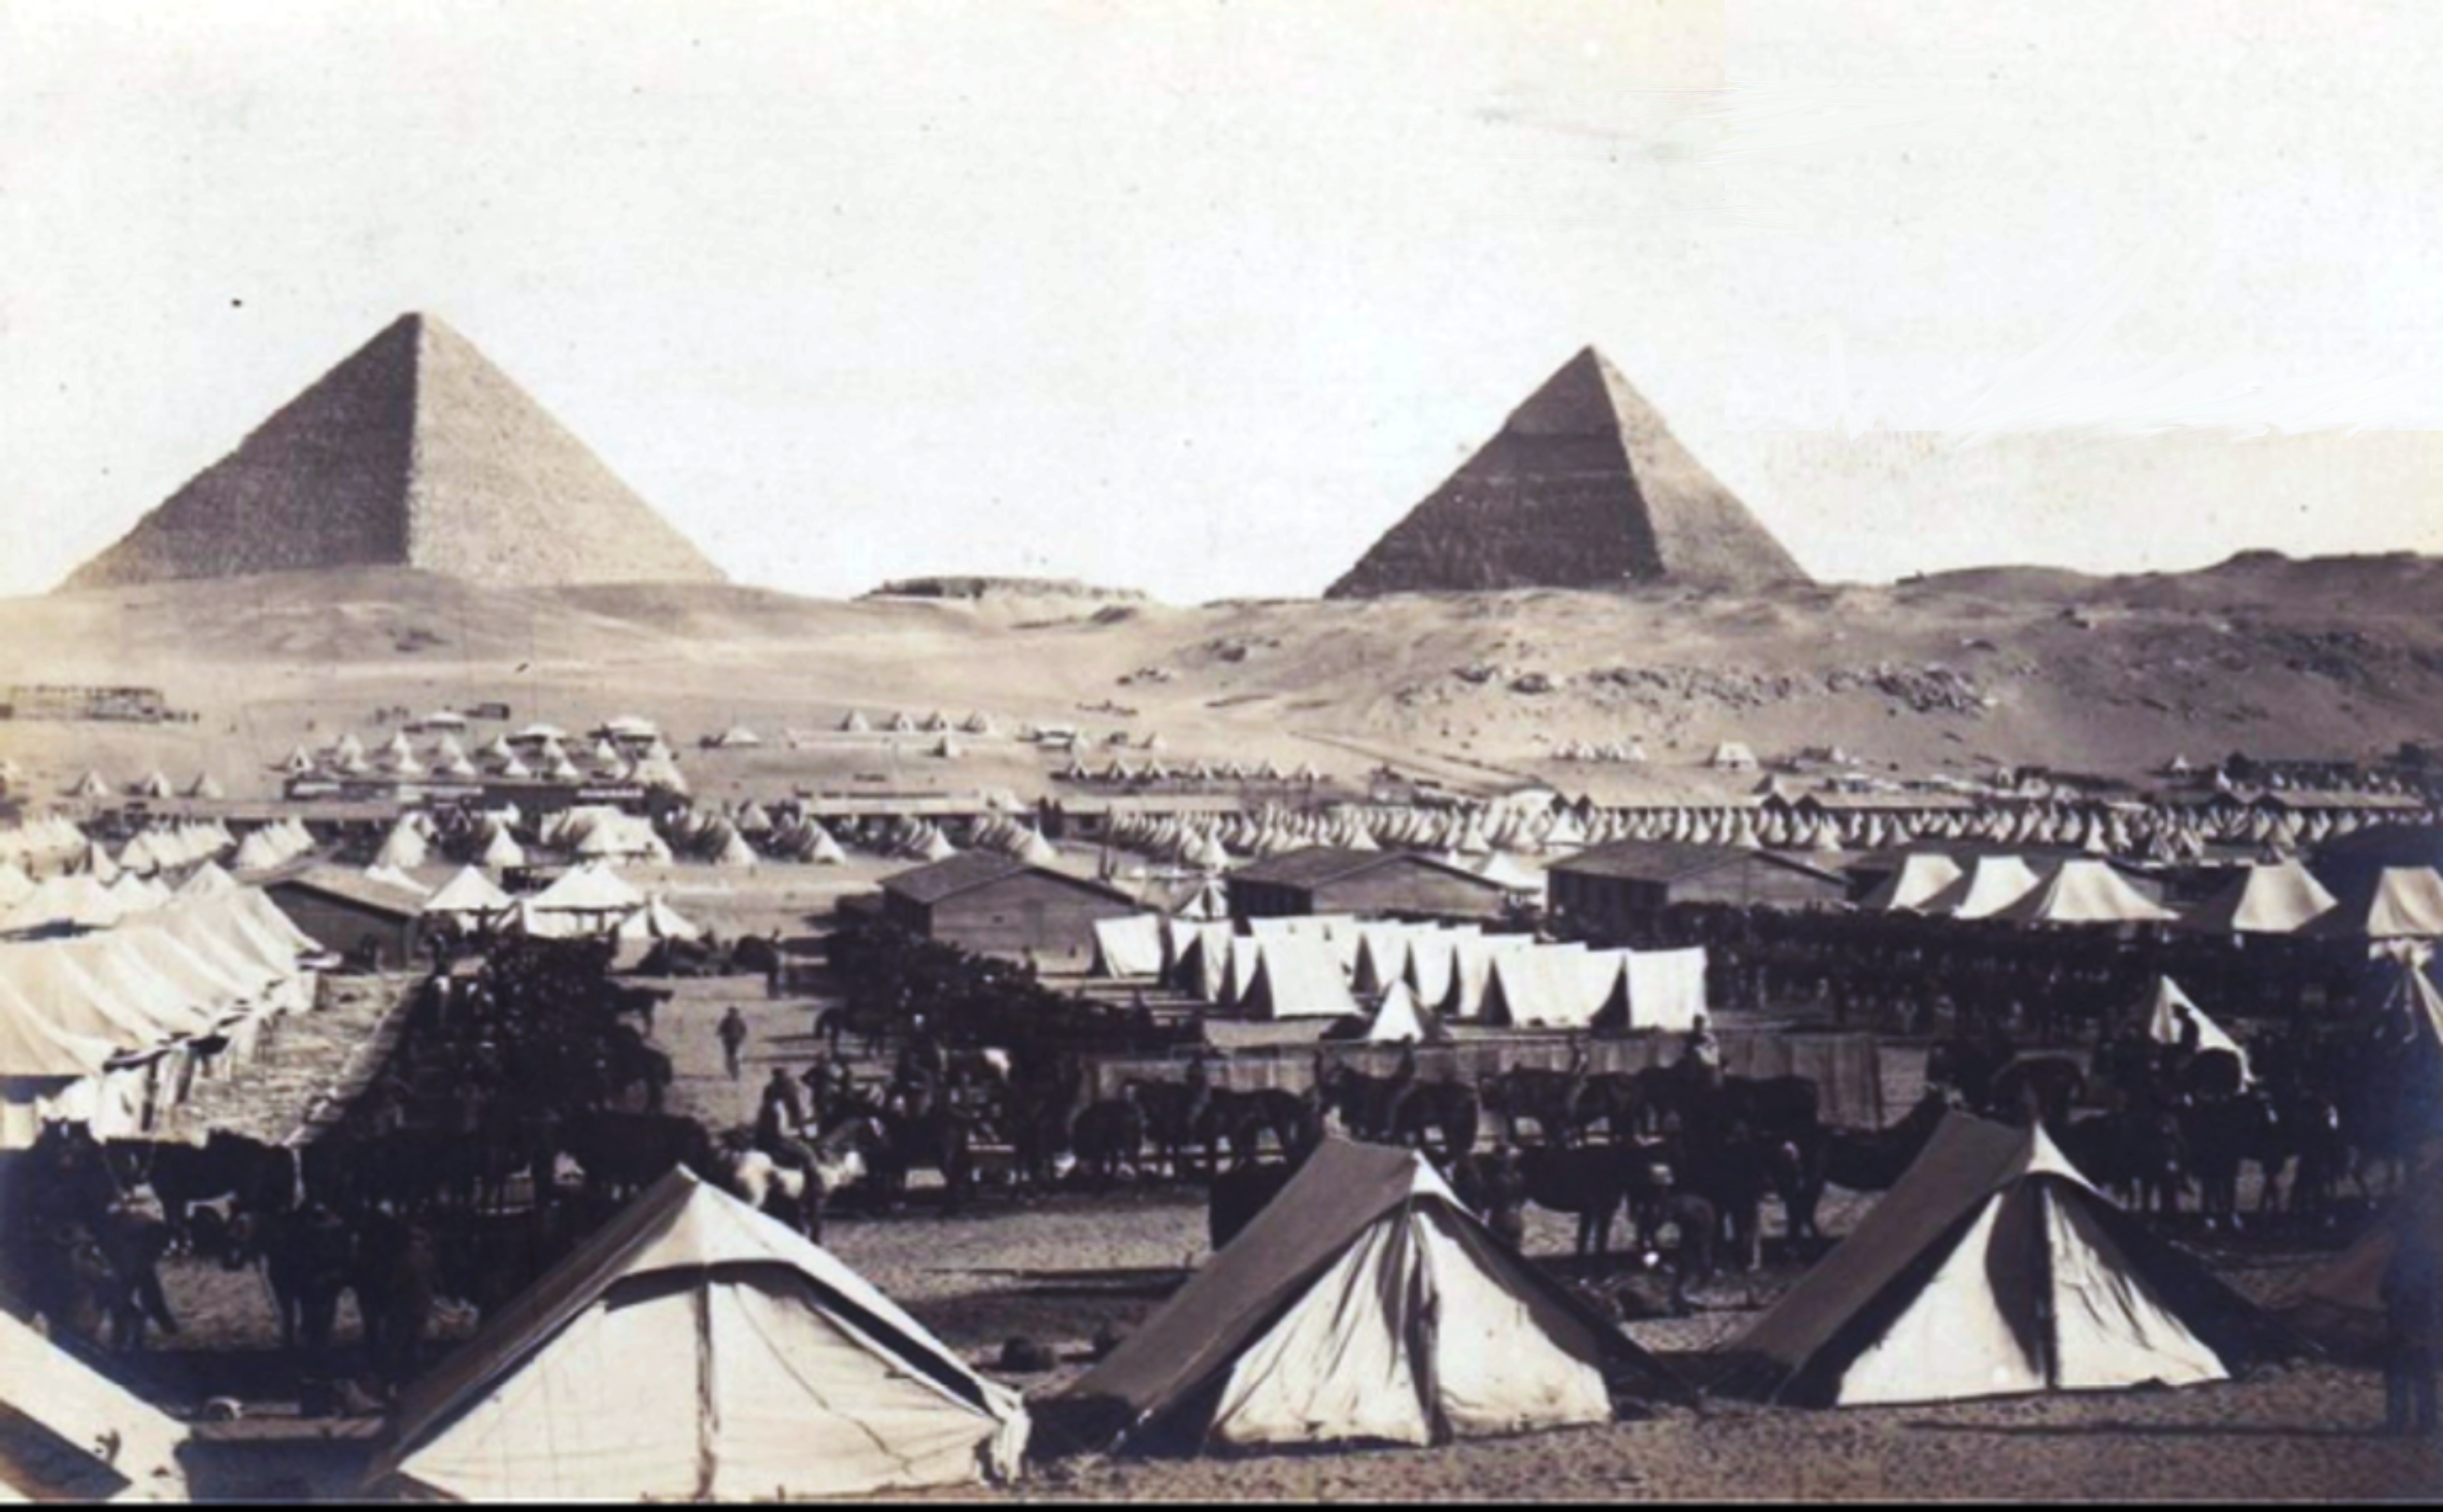
The huge Allied Camp at Mena (near the Pyramids at Gizeh).
On 17 January the Regiment began to move westwards, initially by train to El Hamman (18 January), a town on the northern coast road between Alexandria and Mersa Matruh, in order to join the Western Frontier Force (WFF: see E.F.M. Brown and R.N.M. Bailey). This was commanded by Major-General Alexander Wallace (1858–1922) until, on 12 February 1916, he was forced by an old war-wound to hand over his command to Major-General Sir William Eliot Peyton (1866–1931). The WFF had been hastily created on 11 December 1915, when a two-pronged force of Senussids, members of an army consisting of c.2,000 members of a fundamentalist Islamist sect, most of whom were Libyan nomads but backed and armed by the Turks and Germans, had invaded Egypt and attacked a British column at Duwwar Hussein, between Mersa Matruh and Es Sollum, near the border with Libya on Egypt’s north-western coast. The northern prong went eastwards along the fertile northern coast of Egypt from Es Sollum towards Alexandria, whilst the southern prong involved an advance through the band of oases that begins about one hundred miles west of the Nile. To counter the northern half of this threat, on 26 January 1916 Yeatman’s Regiment entrained for the town of Dabaa, further along the coast to the west, from where they marched via Gezala to Mersa Matruh, which they reached on 1 February 1916 and where they stayed for nearly three weeks. Meanwhile, on 21 January 1916 the 2nd Mounted Division had been disbanded, and on 4 February 1916, the WFF had been reinforced by the 1st South African Brigade, commanded by Brigadier (later Major-General) Henry Timson Lukin (1860–1925), and on 20 February he was ordered to advance eastwards with a mixed force that included the 1/1st Dorsetshire Yeomanry. They reached Um Rukh on the same day and the coastal town of Unjeila on 22 February, and during the march, air reconnaissance had located the Senussi camp at Agagia, 15 miles south of Sidi Barrani. So on the following day, while a small force was left to guard Unjeila, the main force marched 12 miles to Shammas, where, at 08.00 hours on 24 February, Yeatman was ordered to take a small scouting party, consisting of four ORs, to locate the enemy – who opened fire at them from a ridge two miles away to the south.
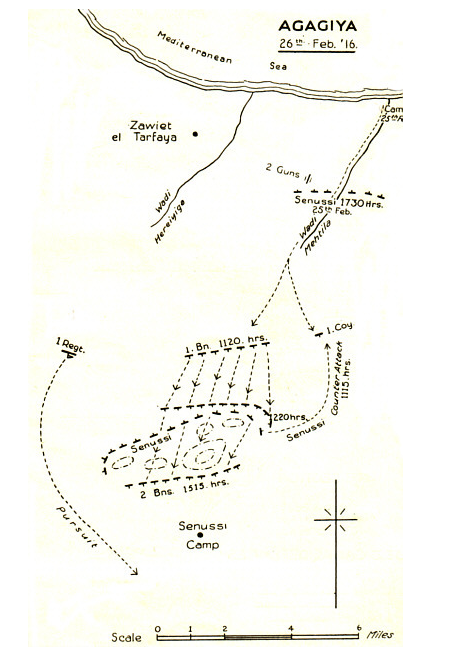
Map: the Battle of Agagia. The infantry attack on the morning of 26 February 1916 can be seen along with the beginning of the Dorset Yeomanry’s flank move (Image courtesy of the Keep Military Museum and QODY Regimental Association) .
On 25 February 1916, the Allies force-marched 16 miles to Wadi el Maktila, eight miles north-east of a place in the desert called Agagia, where, at 17.30 hours, it received orders to march against the enemy at 19.00 hours. But at 18.30 hours the Senussis opened fire at a range of 2,000 yards with two nine-pounder field guns from behind a ridge – although they caused no damage or casualties. So at 05.30 hours on 26 February, the 1/1st Dorset Yeomanry were ordered to locate the strength and position of the enemy and at 09.30 hours it was sent to cut off the enemy’s retreat northwards by outflanking them to the west. The Yeomanry dismounted and advanced on the Senussis from the west on foot, supported by two armoured cars and two battalions of South African infantry. But at 11.20 hours the Allied force came under rifle and machine-gun fire from well-protected positions and casualties began to mount. So Brigadier Lukin ordered a general advance, as part of which the Yeomanry took up a position west of the Senussis’ line of advance. By 14.00 hours the enemy were strung out over a mile of desert and well protected by flank- and rear-guards with machine-guns. After resting their horses, the Yeomanry, reinforced by a detachment from the Buckinghamshire Yeomanry (Royal Bucks Hussars), formed two lines and advanced at the canter, taking casualties as they did so. But when they were 50 yards away from the Senussis’ rear-guard, their Commanding Officer, Lieutenant-Colonel (later Brigadier, DSO) Hugh Maurice Wellesley Souter (b. 1872 in India, d. 1941 in Sydney, Australia), ordered his Regiment to draw swords and charge across open desert against the “fierce and well-equipped Arabs” in a “death-or-glory” decision which cost him seven officers and 55 ORs killed, wounded or missing and 85 horses killed and missing (i.e. a third of his men and half of his horses). At first the defensive fire was accurate, but as the Yeomanry got nearer to the Senussis, it diminished in intensity and the battle, which would be described as “one of the finest charges since Balaclava”, became a rout. Although Colonel Souter was shot off his horse during the charge, he personally effected the capture the Senussis’ Turkish Generalissimo Ja’far Pasha al-Askari (1887–1936), together with his two-man Staff. Moreover, 500 Senussis were killed in action, and 39 prisoners were captured together with 60 camels, fully laden with supplies and ammunition, while the total Allied casualties amounted to 184 killed, wounded or missing. Besides being a victory, the major effect of the battle was to rout the northern Senussi and lead directly to the reoccupation of Sollum three weeks later. Nevertheless, the threat from the Senussis in the south persisted for another year (see Bailey), and they were not finally defeated until the battle that took place near the Siwa Oasis, roughly south of Sidi Barrani and c.170 miles across the desert, from 3 to 5 February 1917.
Lukin’s men returned to the battlefield at Agagia on 27 February 1916 to bury the bodies of the dead in two adjacent graves, one large and one small, and the 1/1st Dorsetshire Yeomanry returned to Wadi el Maktila, where it stayed until 5 March. It then spent two days at Unjeila, a night (8 March) in Shammas, another night at Wadi el Maktila (9 March) and two nights in Sidi Barrani (10/11 March), after which it began to march the 240 miles westwards to the Libyan/Egyptian border via Sharabi (12 March), Baq Baq (13 March), and Elim Tejid (14 March). Sollum fell on 14 March, and on 16 March 1916 the 1/1st Dorsetshire Yeomanry took part in the grand parade to celebrate the town’s capture. On 20 March the Regiment was back in Sidi Barrani, from where, on 21 March, five officers and 100 ORs returned to Agagia to erect a cairn and a cross to commemorate the dead.
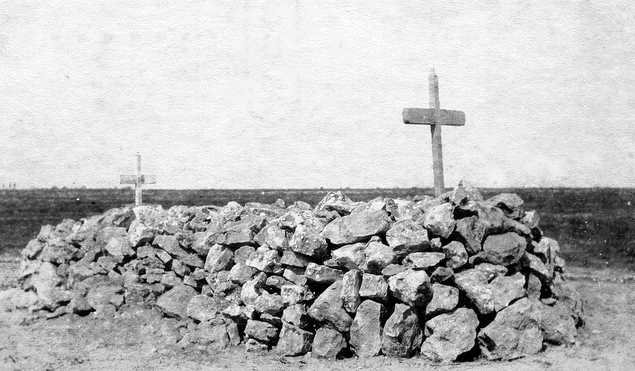
The two graves on the battlefield at Agagia (Photo courtesy of the
Keep Military Museum and Queen’s Own Dorsetshire
But although Yeatman survived what may have been the last major cavalry charge to be made by a British regiment, he missed the final days of the northern campaign after being struck down by diarrhoea and dysentery on 12 March and hospitalized from 15 March until 7 April 1916, when he rejoined his Regiment at Sidi Bishr, a north-western suburb of Alexandria, to which it had been slowly making its way via the coastal road over the previous two weeks and where there was a very large prisoner-of-war camp. The Regiment stayed at Sidi Bishr until 12 May 1916, when it was taken by train to Dairut, near Asyut, c.340 miles to the south and on the west bank of the Nile, where, for six months, it replaced a Regiment of Australian Light Horse in its capacity as part of the 6th Mounted Brigade, an independent unit from October to the end of December 1916, i.e. during the penultimate phase of the Suez Canal Campaign of 1916.
At some time during 1916 Yeatman must have gone back down to Lieutenant, for he was promoted Acting Captain for the second time on 31 October 1916 (London Gazette, no. 29,865, 15 December 1916, p. 12,239) while commanding one of his Regiment’s squadrons when the Regiment was about to move to the railhead town of Gineifa (Geneffe), c.90 miles east of Cairo, via El Shallufa (Shaluf), a town on the Suez Canal just 19 miles north of Suez. Here, the Regiment’s work included defending the southern end of the Canal and much long-range reconnaissance in the Sinai Desert to the east, and on 27 December 1916 it took part in a long-range patrol that was centred on the Wadi el Giddi, north-east of Suez. The Regiment’s War Diary is missing for January 1917, the month when, together with the three regiments of the 5th Mounted Brigade (The Queen’s Own Worcestershire Hussars, the Royal Gloucestershire Hussars, and the Warwickshire Yeomanry) and the other two regiments of the 6th Mounted Brigade (the Royal Buckinghamshire Hussars and the Berkshire Yeomanry), it was incorporated into the newly formed Imperial Mounted Division, commanded by Major-General Sir Henry West Hodgson (1868–1930). But after this incorporation, the 1/1st Dorset Yeomanry remained for nearly eight more weeks in the Gineifa/El Shallufa area and did not take part in the pivotal Battle of Rafah (9 January 1917) – at the northern end of the frontier between Turkish controlled Palestine and British controlled Egypt. The Battle of Rafah was the third battle in the two-year-long campaign to retake the Sinai Peninsula from the Turks – the other two being the Battle of Romani (Pelusium) (3–5 August 1916) and the Battle of Magdhaba (23 December 1916) – which had begun on 14 January 1915 when an Ottoman army numbering 25,000 men had invaded Sinai from the direction of Beersheba and begun to march the 180 miles that separated the frontier from the Canal.
The north-eastern part of the Sinai Desert, showing some of the places mentioned (colours not significant)
On 23 February 1917, Yeatman’s Regiment marched to the Ferry Port on the Suez Canal and crossed from its West to its East Bank. It then marched c.183 miles northwards, to the headquarters of the Egyptian Expeditionary Force at Al Qantarah (Kantara), from where, about a month previously, the Allies had begun to extend the railway line eastwards across the northern end of the Sinai Desert. By then, Al Qantarah was also the major supply depot and hospital centre for the impending advance against the Turks eastwards across the Sinai Desert and northwards into Palestine.
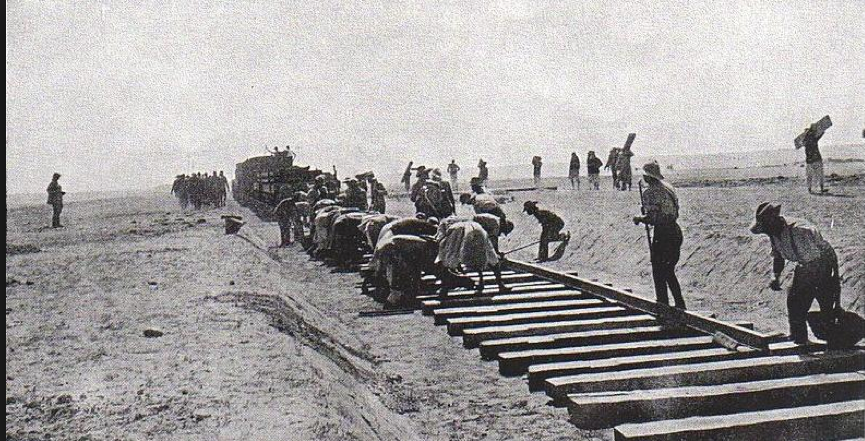
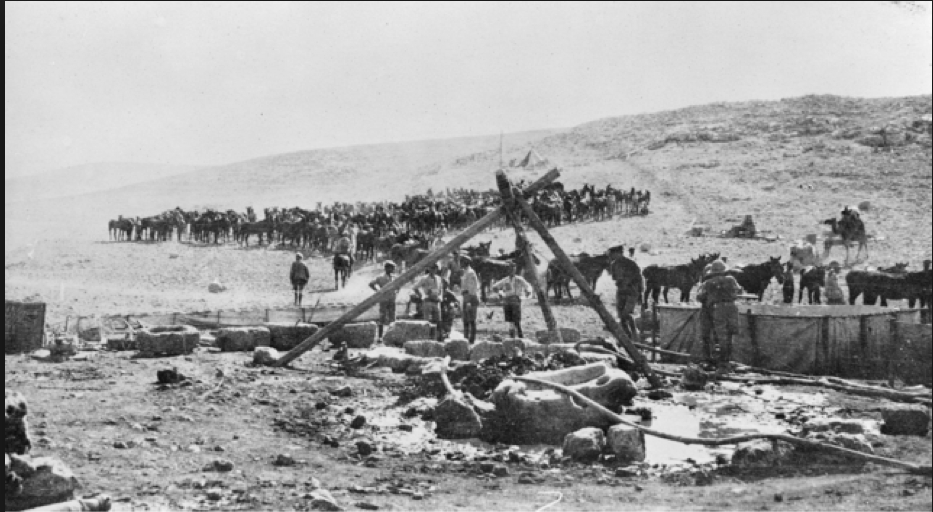
Laying the railway across the Sinai Desert (1917)
On 1 March 1917, the 1/1st Dorsetshire Yeomanry – still a part of the 6th Mounted Brigade – reached its destination and was positioned on Hill 40, five miles to the east of Al Qantarah and just off the main east–west road, and on 5 March 1917 it began to march the c.115 miles east-north-east to Rafah, where it arrived on 22 March as part of the general build-up of Allied forces south of Gaza. But unlike Bailey’s 22nd Mounted Brigade, which assisted, on the afternoon of 26 March, in the capture of the well-fortified Turkish positions at Ali Muntar, the high point less than a mile to the east of Gaza that dominated the town, Yeatman’s 6th Mounted Brigade does not appear to have played any part in the First Battle of Gaza, which began at 02.30 hours on 26 March 1917. At first the Allies made rapid progress, thanks in part to a thick sea fog, and had all but surrounded the city by 10.30 hours without any serious opposition from the Turks. But lack of up-to-date information caused delays and over-cautious generals failed to seize opportunities for want of it. So, by late afternoon, Lieutenant-General Sir Charles Macpherson Dobell (1869–1954), the General Officer Commanding the Eastern Force of the Egyptian Expeditionary Force (EEF), who therefore commanded the Allied forces in the north of the Sinai Peninsula, decided that he would pull his troops back from Gaza if the city had not been taken by nightfall. Dobell in particular suffered badly from the absence of clear and reliable intelligence and so was unaware of significant local victories by the Allies and the strength of their positions, and he did not learn until it was too late of “an intercepted Turkish radio message” which “revealed that the Gaza garrison was on the point of collapse and would have rapidly surrendered under the pressure of further attack”. So as he feared that the Allied troops who were encircling Gaza would be outflanked by Turkish reinforcements from Huj to the north-east and Beersheba to the east and south-east, he issued orders at dusk on 26 March for the Allied Divisions to withdraw, and by dawn on 27 March that withdrawal was complete. Whereupon a large Turkish force counter-attacked just south of Gaza and pushed the Allies back still further after they had suffered somewhere between 2,400 and 4,000 casualties killed, wounded or missing. Unfortunately, the War Diary of Yeatman’s Regiment has little to say either about the above events or its limited participation in the Second Battle of Gaza just under a month later (17–19 April 1917).
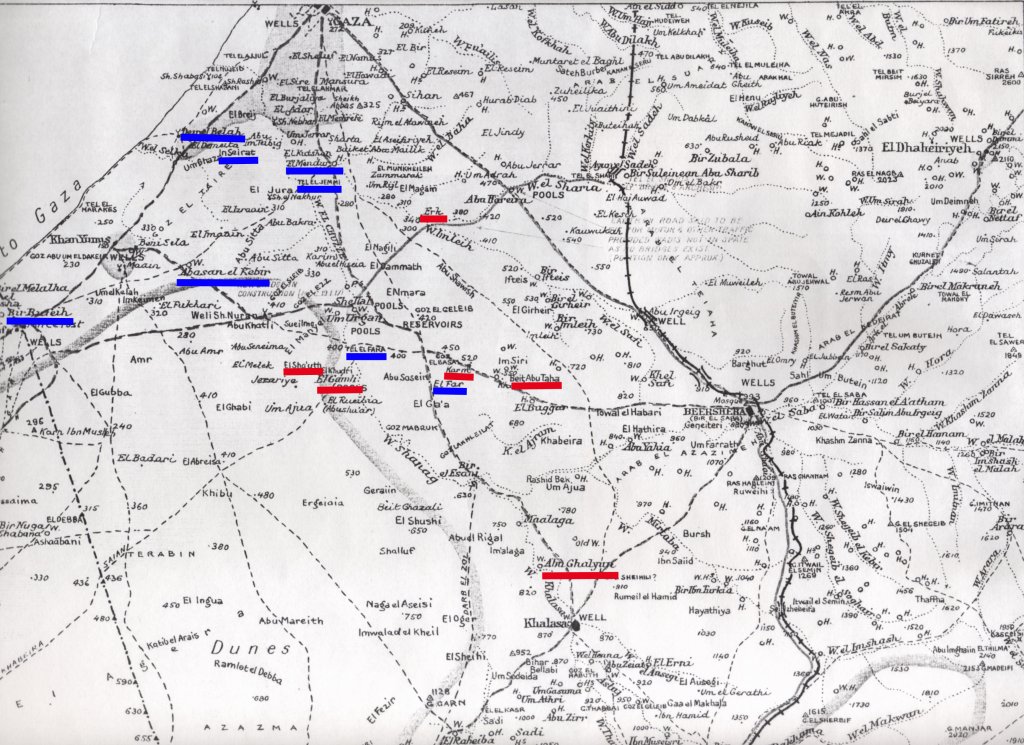
On 29 March, in the wake of this battle, Yeatman’s Regiment was detailed to reconnoitre the coastal area northwards, in the direction of Gaza City, and on that day they got as far as the village of In Seirat, about eight miles south-west of Gaza City, and the nearby Wadi al Humrah; it then spent 30 and 31 March moving to Deir el Balah (Deir el Belah), a village just north of In Seirat and in the middle of the Gaza Strip about half-way between Rafah and Gaza City – where they stayed until 14 April 1917. Then, on 16 April 1917, the eve of the Second Battle of Gaza (17–19 April 1917), Yeatman’s Regiment was, like the rest of the Mounted Cavalry, assembled at Tel el Jemmi, a fairly low hill near El Mendur, a few miles south of Gaza City that was also the headquarters of the Mounted Cavalry Division. The hill had probably been selected as the Divisional HQ because, from its summit, it was possible to observe activity both outside Gaza City itself and on the main road running south-east that linked Gaza with Beersheba.
During the three-week gap that separated the first two Battles of Gaza, the Allies had extended their new railway north-eastwards to Deir el Balah and used it to bring up eight Mk 1 tanks, 14 pieces of heavy artillery, and the two remaining Brigades of 74th Division (see F.R. Charlesworth). The Turks, too, had used the same gap to reinforce their defensive positions in and around Gaza City and had, despite a shortage of barbed wire, widened and deepened the front-line trenches and defences there, and extended their line of entrenched positions and redoubts to Abu Hureira (12 miles east of Gaza City) and c.18 miles south-east of Gaza City in the direction of Beersheba. The Allies had done likewise and they now confronted one another across a no-man’s-land only a few hundred yards wide, up to about the village of Shah Abbas, around three miles south-east of the centre of Gaza City and some four miles east-south-east of the coast itself. At roughly this point, the Allied trench system made a 90-degree turn and continued downwards into the Sinai Desert, with the gap between it and the Turkish trench system, which ran parallel to the Gaza–Beersheba Road, widening all the time.
So given the similarities between the military situation on the Western Front in France and the one at Gaza City, General Dobell decided that his second assault on Gaza would be more like one on the Western Front. It would be preceded by a bombardment of the enemy positions that would make use of his eight tanks and c.350 gas shells together with heavy-calibre shells from ships off-shore; and three infantry Divisions – the 52nd, 53rd and 54th – would make a frontal attack on the southern side of the city. So once Dobell’s infantry were in position on 17 April, the bombardment began at 05.30 hours on 18 April. But the gas shells were weak and ineffectual because the wind dispersed the gas; the tanks proved “a disappointment”; and the infantry made little progress against the Turks’ improved defensive positions. Moreover, during the first phases of the battle, Dobell made little use of his Mounted Divisions since, as on the Western Front, it was assumed that they could rely on the infantry to create gaps through which they would subsequently charge – but those gaps did not materialize in the reinforced Turkish line. Then, once the fighting began in earnest on the second day of the battle, Dobell used his cavalry “wide on the right” – as a screen in the desert to the east, north-east and south-east of Gaza whose task was to protect the right flank of the Allied Army against flanking attacks by the Turks and the possible arrival of Turkish reinforcements. Finally, on the morning of 19 April, the 5th Mounted Brigade and the 3rd and 4th Brigades of the Australian Light Horse – all units in the Imperial Mounted Division – were sent forward as dismounted infantry to help the infantry break through the Turkish line while Yeatman’s 6th Mounted Brigade was kept in Reserve. The attack failed and during the afternoon the 6th Mounted Brigade galloped forward to take the pressure off the two Australian Brigades and enable them to get out of a potentially catastrophic situation, an action which cost Yeatman’s Regiment five ORs wounded. But the battle overall proved to be an even worse defeat for the Allies than its immediate predecessor, for it made no gains and cost the attackers c.6,400 casualties killed, wounded or missing.
As a result, General Dobell was immediately relieved of his command and returned to England; on 21 April 1917 Lieutenant-General Philip Walhouse Chetwode (later Field Marshal, 1st Baron Chetwode of Oakley; 1869–1950) replaced Dobell as the General Officer Commanding (GOC) the Eastern Force of the Egypt Expeditionary Force; and the Australian Major-General (later General) Harry Chauvel (1870–1951) replaced Chetwode as the GOC the Desert Column (later the Desert Mounted Corps). Finally, on 28/29 June 1917, Lieutenant General Sir Archibald James Murray, GCB, GCMG, CVO, DSO (1860–1945), Commander of the British troops in Egypt and the Egyptian Expeditionary Force, was himself recalled to Britain and replaced by the more dynamic – and more accessible – Lieutenant-General Sir Edmund Allenby (later Field-Marshal, 1st Viscount Allenby of Megiddo and Felixstowe; 1861–1936). So, for the next six months of the year, when the temperatures were so high that they precluded any major action (see Bailey, whose Regiment was never very far from Yeatman’s), the Turks and the Allies confronted each other from within their extensive trench systems, mainly across the southern section of the triangle of inhospitable desert formed by Rafah, Gaza and Beersheba, a well-defended small town at the foot of the Judaean Hills whose importance lay in its plentiful wells. The opponents patrolled their trenches and engaged in the occasional action, while the Allied Generals (in particular) set about rethinking their strategy and tactics and preparing their armies for the inevitable autumn offensive. In this process a Magdalen man, Brigadier (later Major-General) Guy Dawnay (1878–1952; Magdalen January 1897–June 1898, left without taking a degree), a merchant banker by profession who rose to become Allenby’s Head of Intelligence, played an important role.
On 19 April Yeatman’s Regiment rode to Knirbet Erk, south-east of Gaza, and then on to El Mendur, where it spent four days. On 23 April it moved to Abasan al Kebira, a town in the southern part of the Gaza Strip, and it spent the period from 24 April to 1 May digging trenches near Tel el Kebira, a 400-foot-high hill with precipitous sides that rose abruptly from the plain on the eastern bank of the Wadi Ghazze and was located half-way (c.14 miles) between Gaza and Beersheba. Tel el Kebira was also situated a mile and a half south of El Shellal, a recently constructed railway station on the branch line that ran into the desert from Rafah for seven miles.
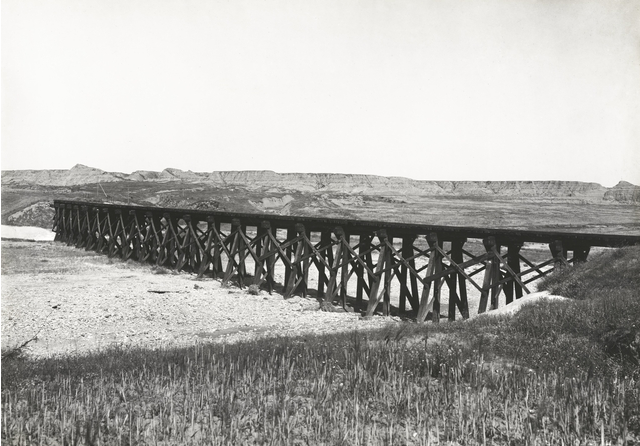
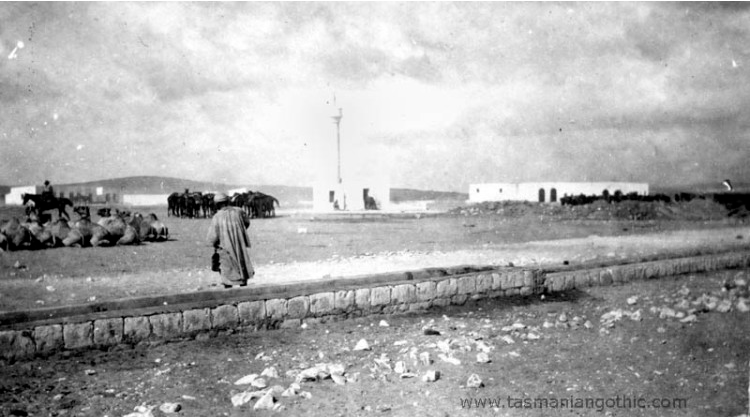
Shellal, Palestine (c. 1917). A wooden railway bridge across the Wadi Ghazze.
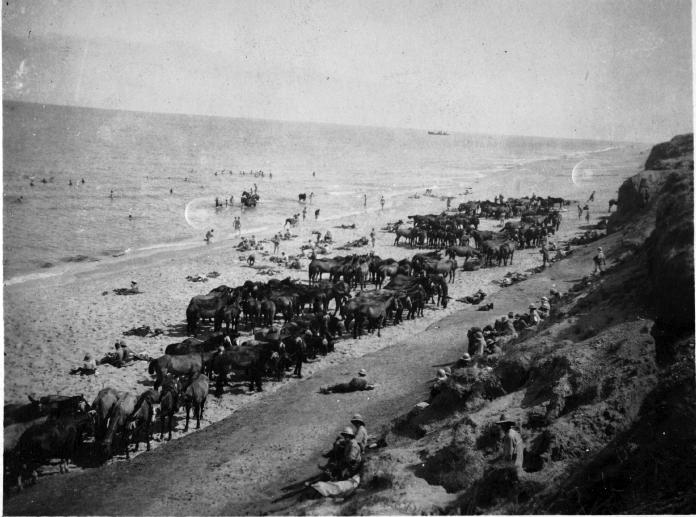
Bailey’s Regiment resting on the Beach, probably in early June 1917 at Tel el Maraqeb, where there are steep cliffs just behind the narrow beach (photo courtesy of the Parliamentary Archives, Westminster).
Yeatman’s Regiment returned to Abassan-el-Kebir on 1 May 1917 and on the following day proceeded to the coastal town of Tel el Maraqeb (see Bailey), where it rested for six days. On 8 May the Regiment set off again, this time on a circular patrol in the desolate, inhospitable area between Rafah and Beersheba that took it through El Fuqhari (8–12 May), El Sha’uth, on the Wadi Shanag (12–17 May), back to El Fuqhari (17–23 May), Khan Khasif, c.12 miles west-north-west of Beersheba (23–25 May), Tel el Maraqeb (25–28 May) and then back to El Shellal, where it stayed until 1 June 1917. On this latter date, the Regiment marched to the village of Karm (Kharm), 15 miles west-north-west of Beersheba, and then up to the village of Beit Abu Taha, a mile or so further on, where it made contact with the enemy. But it soon returned to El Shellal, about seven miles north-west of Karm, where it stayed until 11 June and was involved in a second minor brush with the Turks. By 15 June it was a mile east of El Sha’uth and on 26 June it returned to Tel el Maraqeb, where it rested until 21 July, i.e. during the hottest part of the summer.
Then, between 20 June and 22 July 1917, as part of Allenby’s general reorganization of his command, two existing mounted Divisions (the Anzac Mounted Division and the Imperial Mounted Division), each comprising four Brigades, were turned into three Divisions, each comprising three Brigades. The new Division, commanded by General George de Symons Barrow (1864–1959), was designated the Yeomanry Mounted Division and formed on 20 June 1917 at Khan Yunis, a coastal town a mile or so to the east of Tel el Maraqeb and situated between Rafah (three miles) and Gaza (c.13 miles), from three existing Brigades. These were Yeatman’s 6th Mounted Brigade (which was transferred out of the Imperial Mounted Division and joined the new Division at Tel el Maraqeb on 27 June 1917), the 8th Mounted Brigade (which arrived in Egypt from Salonika on 8 June 1917 and joined the new Division at El Fuqhari on 21 July 1917), and Bailey’s 22nd Mounted Brigade (which was transferred from the Anzac Mounted Division and joined the new Division at El Fuqhari on 6 July 1917).
On 21 July Yeatman’s Regiment marched to Abasan el Kebir, around two miles east of Khan Yunis, and on 23 July it was told to be ready to move at 02.45 hours as it had been reported that the enemy was on the point of evacuating Beersheba. In the event, nothing happened and the 1/1st Dorset Yeomanry stayed where it was until 15 August 1917, when it moved to the oasis village of El Gamli, a few miles south-west of Abassan el Kebir and near the Wadi Shanag, in order to be attached to the Anzac Mounted Division and take part in an uneventful operation on the following day. On 18 August 1917, the Regiment marched eastwards to Tel-el-Farah, a hill in the Western Negev that is about halfway between Farah and Beersheba and two miles west of Karm, and stayed there until 24 August, when it was involved in a minor operation at nearby Ibattalion Said that cost it one officer and 17 ORs wounded.
Yeatman’s Regiment returned to Tel-el-Farah on 25 August 1917 and stayed there until 16 September, when it went back to Tel-el-Maraqeb, initially to rest. But it remained there until 30 October 1917, undergoing intensive training in musketry, the handling of grenades, and close combat with bayonets. Despite this preparation, the 1/1st Dorset Yeomanry Regiment played no great part either in the Battle of Beersheba (29–31 October) or in the Third Battle of Gaza (27 October–7 November), which, apart from their inherent strategic benefits (see below), were two massive diversionary operations, the brain-child of Lieutenant-General Chetwode, the GOC XX Corps. The aim was to confuse the Turks into believing that the Allies’ priority was yet another futile Western Front-style assault on Gaza City from the south. Whereas in fact, the Allies intended to make a surprise attack on Beersheba, well to the south-east. This would encourage the Turks to move their reserves away from Gaza City to the fighting in the east and south-east, making it difficult to recall them westwards and north-westwards once the real attack on Gaza was under way.
So on 30 October 1917 the 6th Mounted Brigade concentrated at Khan Yunis and then marched the c.12 miles to El Shellal, where most of the Yeomanry Mounted Division, including Bailey’s 22nd Mounted Brigade plus a Brigade from the 10th (Infantry) Division, were already in General Headquarters Reserve. During the same period, the rest of the 10th Division, plus the other three infantry Divisions of XX Corps – the 53rd (Welsh), the 60th (2/2nd London), and the 74th (Yeomanry) – moved to Beersheba as unobtrusively as possible by night. The 53rd Division and the Brigade from the 10th Division, which had approached Beersheba from the west, dug in along Wadi Hanafish to the west of the town, whilst the 60th and 74th Divisions, which had approached Beersheba from the south-west, dug in to the south-west of the town, with the 60th Division on the right and the 74th Division on the left. Then, at 18.00 hours on the evening of 30 October 1917, units of the Anzac Mounted Division and the Australian Mounted Division began their advance on Beersheba from the villages of Asluj (to the south) and Khasala (to the south-west). But the Turkish resistance at the hill known as Tel-el-Saba (Tel-el-Sabe), some two-and-a-half miles west of Beersheba, was stronger than anticipated, and although the hill was captured by New Zealand troops at 15.00 hours on 31 October 1917, a stalemate was in danger of developing until, at 16.30 hours, Brigadier William Grant (1870–1939), with the 5th and 7th Australian Light Horse Brigades and a Battery of the Royal Horse Artillery in support, led the 4th and 12th Australian Light Horse Brigades in a surprise attack on Beersheba from the east using bayonets intead of sabres. The attack happened with such lightning speed that by 18.00 hours the Turkish garrison, which had lost roughly half of its number killed or wounded, had either surrendered or withdrawn northwards along the Gaza road. Although the Turks had had just enough time to destroy much of their pumping equipment, 15 out of the 17 wells were still intact when they were captured by the Australians, who, quite apart from anything else, had shown the continuing effectiveness of cavalry when used in its own right under the right conditions rather than as mounted infantry.
The desert Village of Asluj, south of Beersheba (October 1917).
The wells at Tel-el-Khuweilfeh just after their capture by the 53rd Division and the 3rd Battalion, Imperial Camel Corps Brigade, on 6 November 1917.
Unlike the first two Battles of Gaza, the Third Battle had been meticulously planned as a three-part rolling set of actions and manoeuvres, with water dumps secretly provided in advance. The first part is also known as the Battle of Tel-el-Khuweilfeh (1–6 November 1917), a small town in the southern Judaean Hills, c.13 miles north-east of Beersheba, which, like Beersheba, possessed significant water supplies. The second part was the most important part of the battle, because, if successful, it would allow Allenby’s army to advance into northern Philistia and thence into Judaea. It involved the well-prepared Turkish defensive line that curved downwards and westwards from Tel-el-Khuweilfeh, then westwards through the village of Tel-esh-Sheria, where there were important wells and where the north–south railway line crosses the Wadi el Sheria, then passes through nearby Abu Hureira on the maritime plane, and finally rises north-westwards to Gaza on the coast. And the third part involved a phased attack on Gaza City itself which would, in fact, be a diversionary attack until the outcome of the attacks on Beersheba, Tel-el-Khuweilfeh and Tel-esh-Sheria were known.
So after two-and-a-half weeks of preparatory bombardment (which had started, deceptively, on 27 October) by 68 pieces of heavy artillery supplemented by the armament of one cruiser and four monitors off-shore and Grant’s success at Beersheba, the centrality of the attack on Gaza gradually increased. It began with a preliminary attack by the Allies on Umbrella Hill at 23.00 hours on 1 November, with the main Allied attack following at 03.00 hours on 2 November. This was so successful that by 06.15 hours almost all the main objectives had been taken and the way was open to the village of Sheikh Hassan on the coast, just to the north of the northern suburbs of Gaza City. But the fierce fighting around Gaza continued for another four days between the three Divisions of the Allies’ XXI Corps (the 52nd, Lowland; the 54th, East Anglian; and the newly established 75th<), commanded by Lieutenant-General Edward Bulfin (1862–1939). As Allenby and Chetwode intended, the Turks soon sent their reserves away from Gaza City to relieve the pressure on their forces further over to the east. Consequently, by midnight on 6/7 November the three Divisions of the Ottoman XXII Corps who constituted the Turkish garrison of Gaza City, commanded by the extremely competent Mirliva (Major-General) Refet Bey (1877–1963), were finally compelled to withdraw northwards in good order from the city’s gutted and deserted ruins, destroying roads, bridges and water-lifting plant as they went. And when the Allies’ XXI Corps attacked Outpost Hill and Middlesex Hill on the eastern and south-eastern sides of Gaza City at 23.30 hours on 6 November and occupied them in the small hours of 7 November, they encountered no opposition and the road that led to Jerusalem was all but open, despite the Turks’ plan to establish a defensive position along the Wadi Hedi, about seven miles north of Gaza City and seven miles south of Ashkelon (Askelon), which they had already partially fortified and where there was heavy fighting on the afternoon of 8 November which ended with the capture of Sausage Ridge by units of 52nd Division (see W.H.R. Crick).

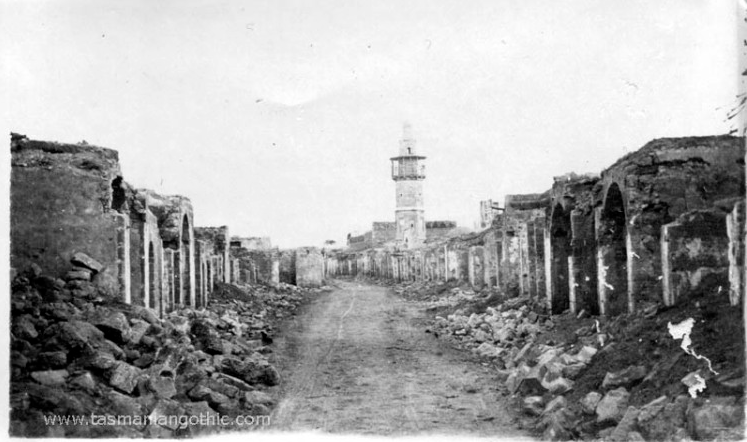
The ruined Great Mosque in Gaza City (1917).
Gaza after its capture by the Allies. The Mosque at the end of the street is probably the one just below the skyline in the top centre of the photo below (November 1917).
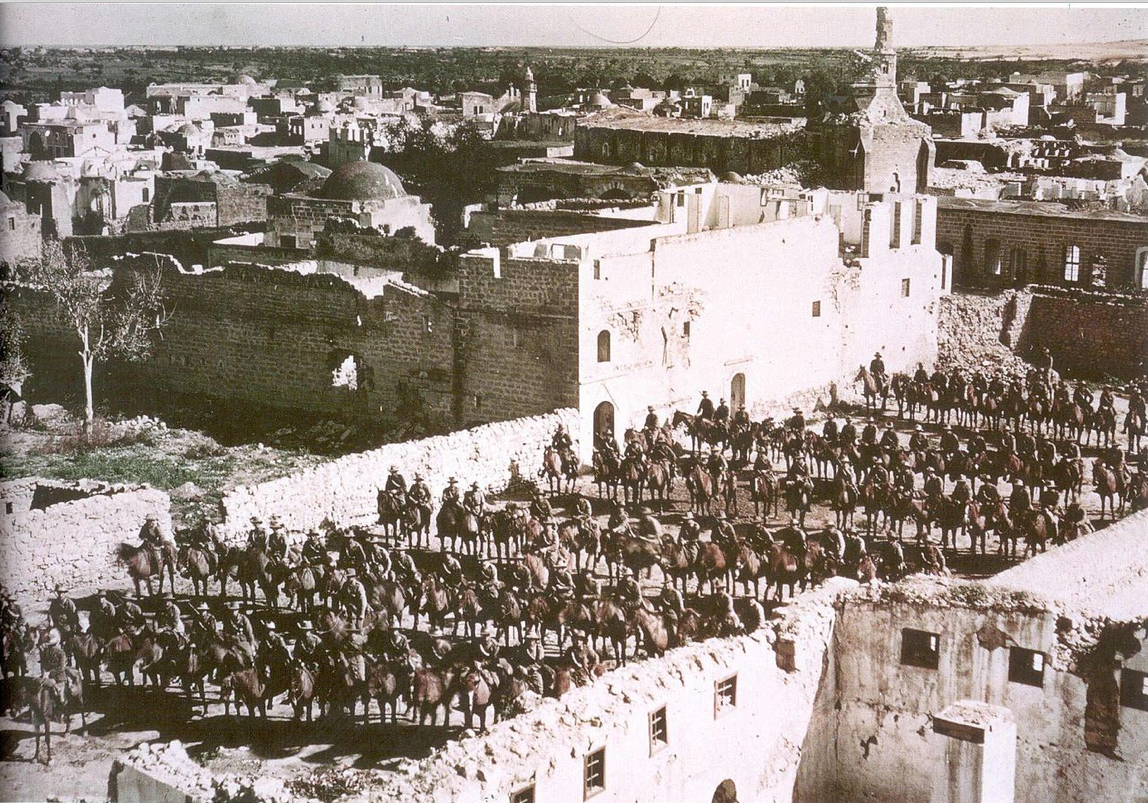
Gaza after its capture by the Allies. The ruined Great Mosque can be seen in the right centre of the photo (1917/18).
Meanwhile, on 2 November 1917, the 6th Mounted Brigade (including the Dorset Yeomanry) moved to Imara (Emara), a station on the railway line a few miles east of Shellal and 16 miles west-north-west of Beersheba, where it was involved in an action. On 3 November it was decided that the Desert Mounted Corps, which included the Yeomanry Mounted Division, should prepare to attack the Turkish line on the following day, but water shortage caused the attack to be pushed back by two days pending the arrival of adequate supplies. By 4 November 1917, Bailey’s 22nd Mounted Brigade had reached Bir-el-Girheir, where it formed part of a thinly stretched outpost line near the Buqqar (Baqqar) Ridge, the scene of very fierce fighting with the Turks during the four last days of October. On 5 November, the Desert Mounted Corps entered Beersheba, after which it, together with the Allied XX Corps (see Charlesworth), marched north-westwards for three days up the road connecting Gaza City with Beersheba to the Turkish defensive line that straddled it and joined the Redoubt at Abu Hureira in the west with Tel-esh-Sheria to the east. So while, on the morning of 6 November, three of the four Divisions comprising XX Corps attacked the four-mile-long defensive positions at Tel-esh-Sheria, the Desert Mounted Corps and the 53rd Division successfully attacked the Turkish positions at Tel-el-Khuweilfeh, and by the evening of 7 November the entire Turkish line between Abu Hureira and Tel-esh-Sheria had been captured despite strong Turkish resistance and the shortage of water.
Over the next two days, this success allowed Allied troops to advance as far north as the town of Huj, seven miles east of Gaza City, and, on 8 November, to capture it together with a significant amount of men and materiel. This was accomplished thanks to a cavalry charge on the Austro-German and Turkish gun positions by three Squadrons from the Warwickshire and Worcestershire Yeomanry Regiments, both units of the 5th Mounted Brigade, which cost them nine officers (including all three Squadron Commanders) and 96 ORs killed, wounded or missing. Allenby had hoped that this success would enable the Allies to annihilate the Gaza garrison as it moved northwards through Philistia, but this proved to be too optimistic, not least because of the number of prisoners that the Allies were capturing. Yeatman’s 6th Mounted Brigade was not involved in the above action as it had returned to Beersheba and the Judaean Hills to the north of the town on 5 November, losing seven ORs wounded between then and 8 November, when it proceeded to Khir bet Resk and then Tel-esh-Sheria, probably to take on water supplies after covering 60 miles in 54 hours without any water for their horses.
However, Allenby was also determined that the Allied advance northwards should prevent the retreating Turks from consolidating their positions and counter-attacking, and over the next three days, the Yeomanry Mounted Division, including Yeatman’s 6th Mounted Brigade and Bailey’s 22nd Mounted Brigade, zig-zagged northwards. Yeatman’s Brigade marched from Tel-esh-Sheria to Simsim, then swung westwards across the desert to the coast before turning northwards parallel with the coast via the Wadi el Mejdel (ten miles north of Gaza City and about three miles south of Ashkelon; 11 November), a total distance of about 20 miles. It then marched further northwards still via Hamameh and Abli Herazem to Jisr Esdud (the Israeli town of Ashdod; 12 November) as part of the protective screen that was formed by the Yeomanry Mounted Division on the left of Allenby’s advancing army.
At 13.00 hours on 12 November, four Ottoman Divisions launched the expected counter-attack – not against the left of the Allied line, which was by now poised to attack north-eastwards through the Judaean Hills to Jerusalem, but against the scattered Brigades of the Australian Mounted Division who were protecting the right of the Allies’ line. The Turks’ intention was to outflank the Australian Brigades and attack Allenby’s army, which was lining up facing eastwards in order to take the key railway station at the Wadi es Dara that was known as Junction Station, since it was here that the narrow-gauge Turkish main line to Gaza and Beersheba branched off eastwards to link the coast with Jersualem in the east. At first the Australians were forced to pull back southwards from Tel-el-Safi in the north through Balin and Barquaya in the east, but the Allied withdrawal was carefully conducted at the cost of relatively few casualties, and by 18.00 hours the Turkish attack had petered out before the village of Summil. As a result, the Turkish General commanding the counter-attack decided not to involve the 3rd Cavalry Division by sending it into the battle-zone from its Reserve position east of Summil.
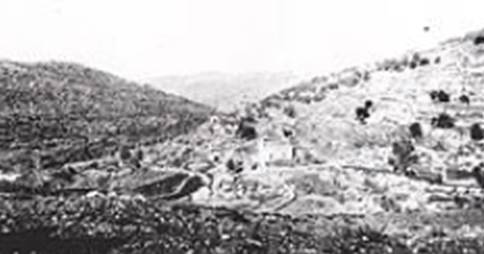
Typical Judaean Hills landscape (1917).
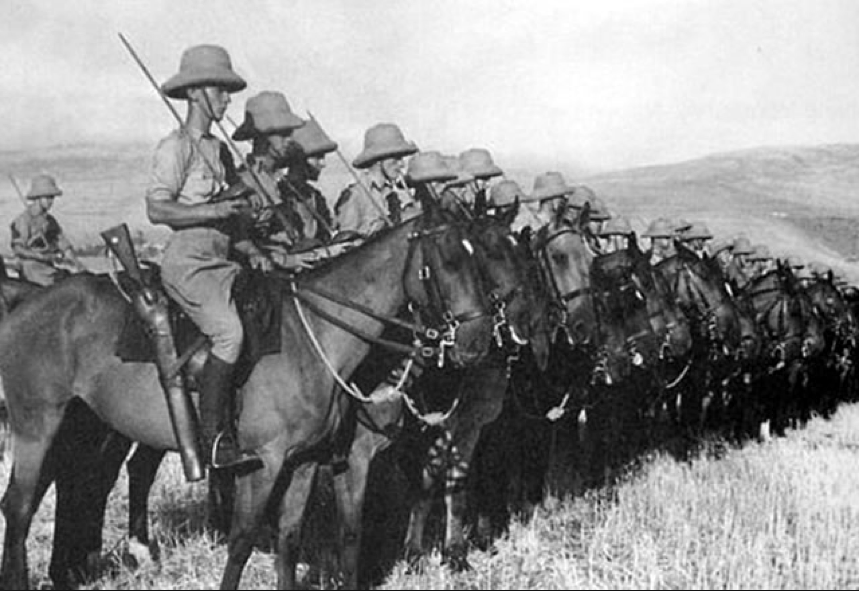
The Cavalry with drawn sabres drawn up in preparation for the Charge at El Mughar (El Maghar) Ridge (November 1917).
On 13 November, the day Yeatman was promoted to Captain (London Gazette, no. 30,625, 9 April 1918, p. 4,425), and the day when Allenby’s advance towards Jerusalem began in earnest, not least in anticipation of the expected heavy rains, which, fortunately for the Allies, did not begin until 19 November, Yeatman’s 6th Mounted Brigade participated in the capture of the village of Yebnah (the Israeli town of Yavna) by the Yeomanry Mounted Division. But Allenby’s progress eastwards through the Judaean Hills was hindered by determined Turkish resistance, especially at the fortified villages of El Mughar (El Maghar) and Qatra, some three miles south of Yebnah and nine miles south-west of the town of Ramleh, and at the north–south El Mughar Ridge that lay to the east of the village of the same name and controlled it. So at around 14.30 hours it was agreed that two Battalions of the 52nd (Lowland) Infantry Division should deal with the villages while two Regiments from the 6th Mounted Brigade – the 1/1st Buckinghamshire Yeomanry and Yeatman’s 1/1st Dorset Yeomanry – supported by the Brigade’s machine-gun Squadron and a Battery of the Royal Horse Artillery, and with the 1/1st Berkshire Yeomanry in Reserve, should assault the well-fortified ridge.
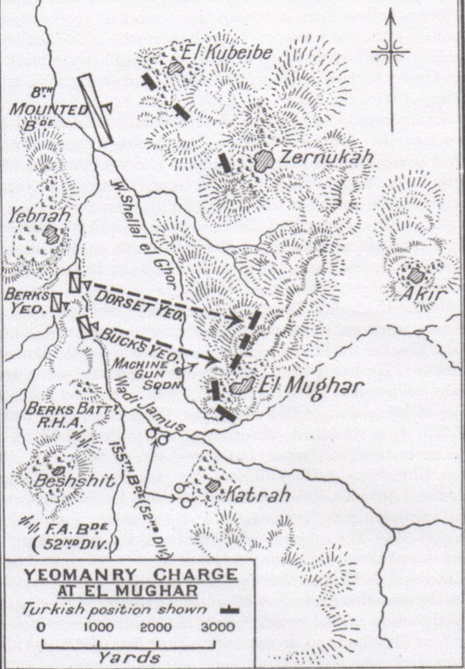
Map of the area around El Mughar (Maghar) (13 November 1917).
The attack began at 15.00 hours as a two-pronged charge from west to east for about two-and-a-half miles, across the narrow Wadi Jamus (called the Wadi Qatra to the west of the El Mughar Ridge), and then up the steep slope of the ridge. While the Buckinghamshire Regiment dismounted at the foot of the right-hand spur, and scrambled to the top as dismounted infantry, Yeatman’s Regiment galloped up the left-hand spur, dismounted at the crest, fixed bayonets and charged the Turkish position – whereupon the defenders ran off en masse in the direction of Akr (Aqir), about three miles away to the north-east. The War Diary of the 1/1st Dorset Yeomanry described the action as a “complete success”, for a total of 1,396 Turkish officers and ORs had been taken prisoner, over 2,000 Turks had been killed or wounded, and 14 machine-guns and two field guns had been captured. But the fighting had continued until around 17.00 hours and had cost the two Regiments 129 officers and ORs killed, wounded or missing and 265 horses, with Yeatman’s Regiment alone losing 55 officers and ORs killed, wounded or missing and 80 horses wounded and missing. Meanwhile, Bailey’s 22nd Mounted Brigade was preparing to play its part in Allenby’s advance by capturing the village of Akr (Aqir), some two miles north-west of Yebnah.
By the morning of the following day, 14 November 1917, the Turks in Philistia were retreating in large numbers. They had evacuated the village of Akr during the night and Bailey’s Regiment finally occupied that particular village at 06.30 hours, losing 14 ORs killed, wounded or missing as it did so. Finally, at 11.00 hours, the 1/1st Dorset Yeomanry was ordered to come down from the hills and occupy the village of Ne’ane (also Naane, the modern-day town of Naan), roughly halfway between the large town of Ramleh to the north and Junction Station to the south, which had been captured that morning by several armoured cars and a Brigade of the 75th Division (see Crick). Ne’ane had a strategically important railway station, and while Bailey was leading the attack on the station, a sniper’s bullet hit him in the skull, mortally wounding him. He was evacuated, unconscious, and taken to Cairo by train, where he died of wounds received in action on 1 December 1917.
The ten-day pursuit of the Ottoman armies following their retreat from Gaza City had all but finished by the evening of the day when Bailey was mortally wounded, since by this time the Turkish Seventh and Eighth Armies had been split from one other and were contained, respectively, in the Judaean Hills and the coastal strip. But on 15 November Yeatman’s Regiment was tasked with capturing the Abu Shusheh (Shusha) Ridge, a mile or so to the east of Ramleh, where Turkish artillery protected the eastern flank of the town. Together with Bailey’s 22nd Mounted Yeomanry Brigade, Yeatman’s 6th Mounted Yeomanry Brigade mounted a two-pronged attack on the ridge and took it before dusk, and after spending the night of 15/16 November in or near the village of Khir bet Malet, to the south of Ramleh and now destroyed, Yeatman’s Regiment seems to have begun a pincer movement against the Turkish flanks at 09.00 hours on 16 November, with ‘C’ Squadron going round to the right and ‘A’ and ‘B’ Squadrons going round to the left. Once again, a straightforward cavalry charge proved successful and the Regiment was able to enter Ramleh at about 11.00 hours on the following day and Lydda a few hours later. Yeatman’s Brigade then spent the night of 17/18 November two miles south-east of Ramleh and rested there on 18 November while Allenby’s increasingly victorious army rested for a day, consolidated its gains, reorganized itself, and prepared to capture Jerusalem by means of an encircling, clockwise movement from the north-east rather than a direct attack.
On 19 November, in pouring and incessant winter rain for which the Allied troops were very ill-equipped, Yeatman’s Regiment, as part of the Yeomanry Mounted Division and accompanied by the 20th Brigade, Royal Horse Artillery, set off eastwards in a single-file column that was nearly six miles long through the bleakest and roughest part of the northern Judaean Hills along a network of paths that were little more than narrow, unmetalled goat tracks. A mile or two to their right, the 52nd Infantry Division was advancing in parallel along tracks that were only marginally less difficult. The goal of both columns was the ancient village of Bireh (el-Birah, al-Birah), nine miles north of Jerusalem, one of the administrative and political centres of the Ottoman Empire in that region. But Bireh was also a major crossroads where the road leading northwards to Nablus, the headquarters of the 7th Ottoman Army, intersected with the east–west road linking Jerusalem with the Coast. Once at Bireh, the two Allied columns were supposed to join forces and cut the Turks’ main lines of communication, but because of the appalling weather and the consequent slowness of their advance, on 19 November Yeatman’s Regiment managed to get only as far as the village of Beit Ur et Tahta, in the northern part of the West Bank of the River Jordan. On 20 November, the Regiment set off at 05.30 hours, marched via Beit Ur al Fauqa (el-Fokka, el-Foqa), and got within a few miles of Bireh. But as 3,000 Turks, supported by artillery, were well dug in on the Zeitun Ridge, a steep, narrow ridge that was nearly a mile long and ran north–south between Beit Ur al Fauqa in the east and Bireh in the west, the Allied forces were unable to get past it and take Bireh.
So Yeatman’s Regiment, like the rest of the 6th Mounted Brigade, withdrew to Beit Ur al Fauqa where it received orders to advance towards Beitunia (Beituniye), nine miles north of Jerusalem and a few miles south-west of Bireh, on 21 November 1917. At about 11.30 hours the 6th Mounted Brigade, led by Yeatman’s 1/1st Dorset Yeomanry, began to descend from the hills but found themselves held up once again by the western slopes of the Zeitun Ridge. The fighting here went on until late in the winter afternoon and involved several failed attempts to take the ridge. But at about 16.40 hours, Turkish reinforcements arrived and immediately counter-attacked, forcing the exhausted men of the Mounted Yeomanry Brigade, who had been holding an advanced position all day, to retire. During their withdrawal, Yeatman’s Regiment lost seven officers and 44 ORs killed, wounded or missing and although its War Diary does not mention Yeatman by name, later reports confirm that when one of his men was wounded during the withdrawal, Yeatman went out to bring him in under heavy fire and was killed in action, aged 37. He is buried in Jerusalem War Cemetery, Grave E.56. His obituary in The Times says that at the time of his death, he was to be recommended for the MC. He left £3,762 13s 2d. The Zeitun Ridge was the scene of more fierce fighting and would not be taken until 27 December 1917.
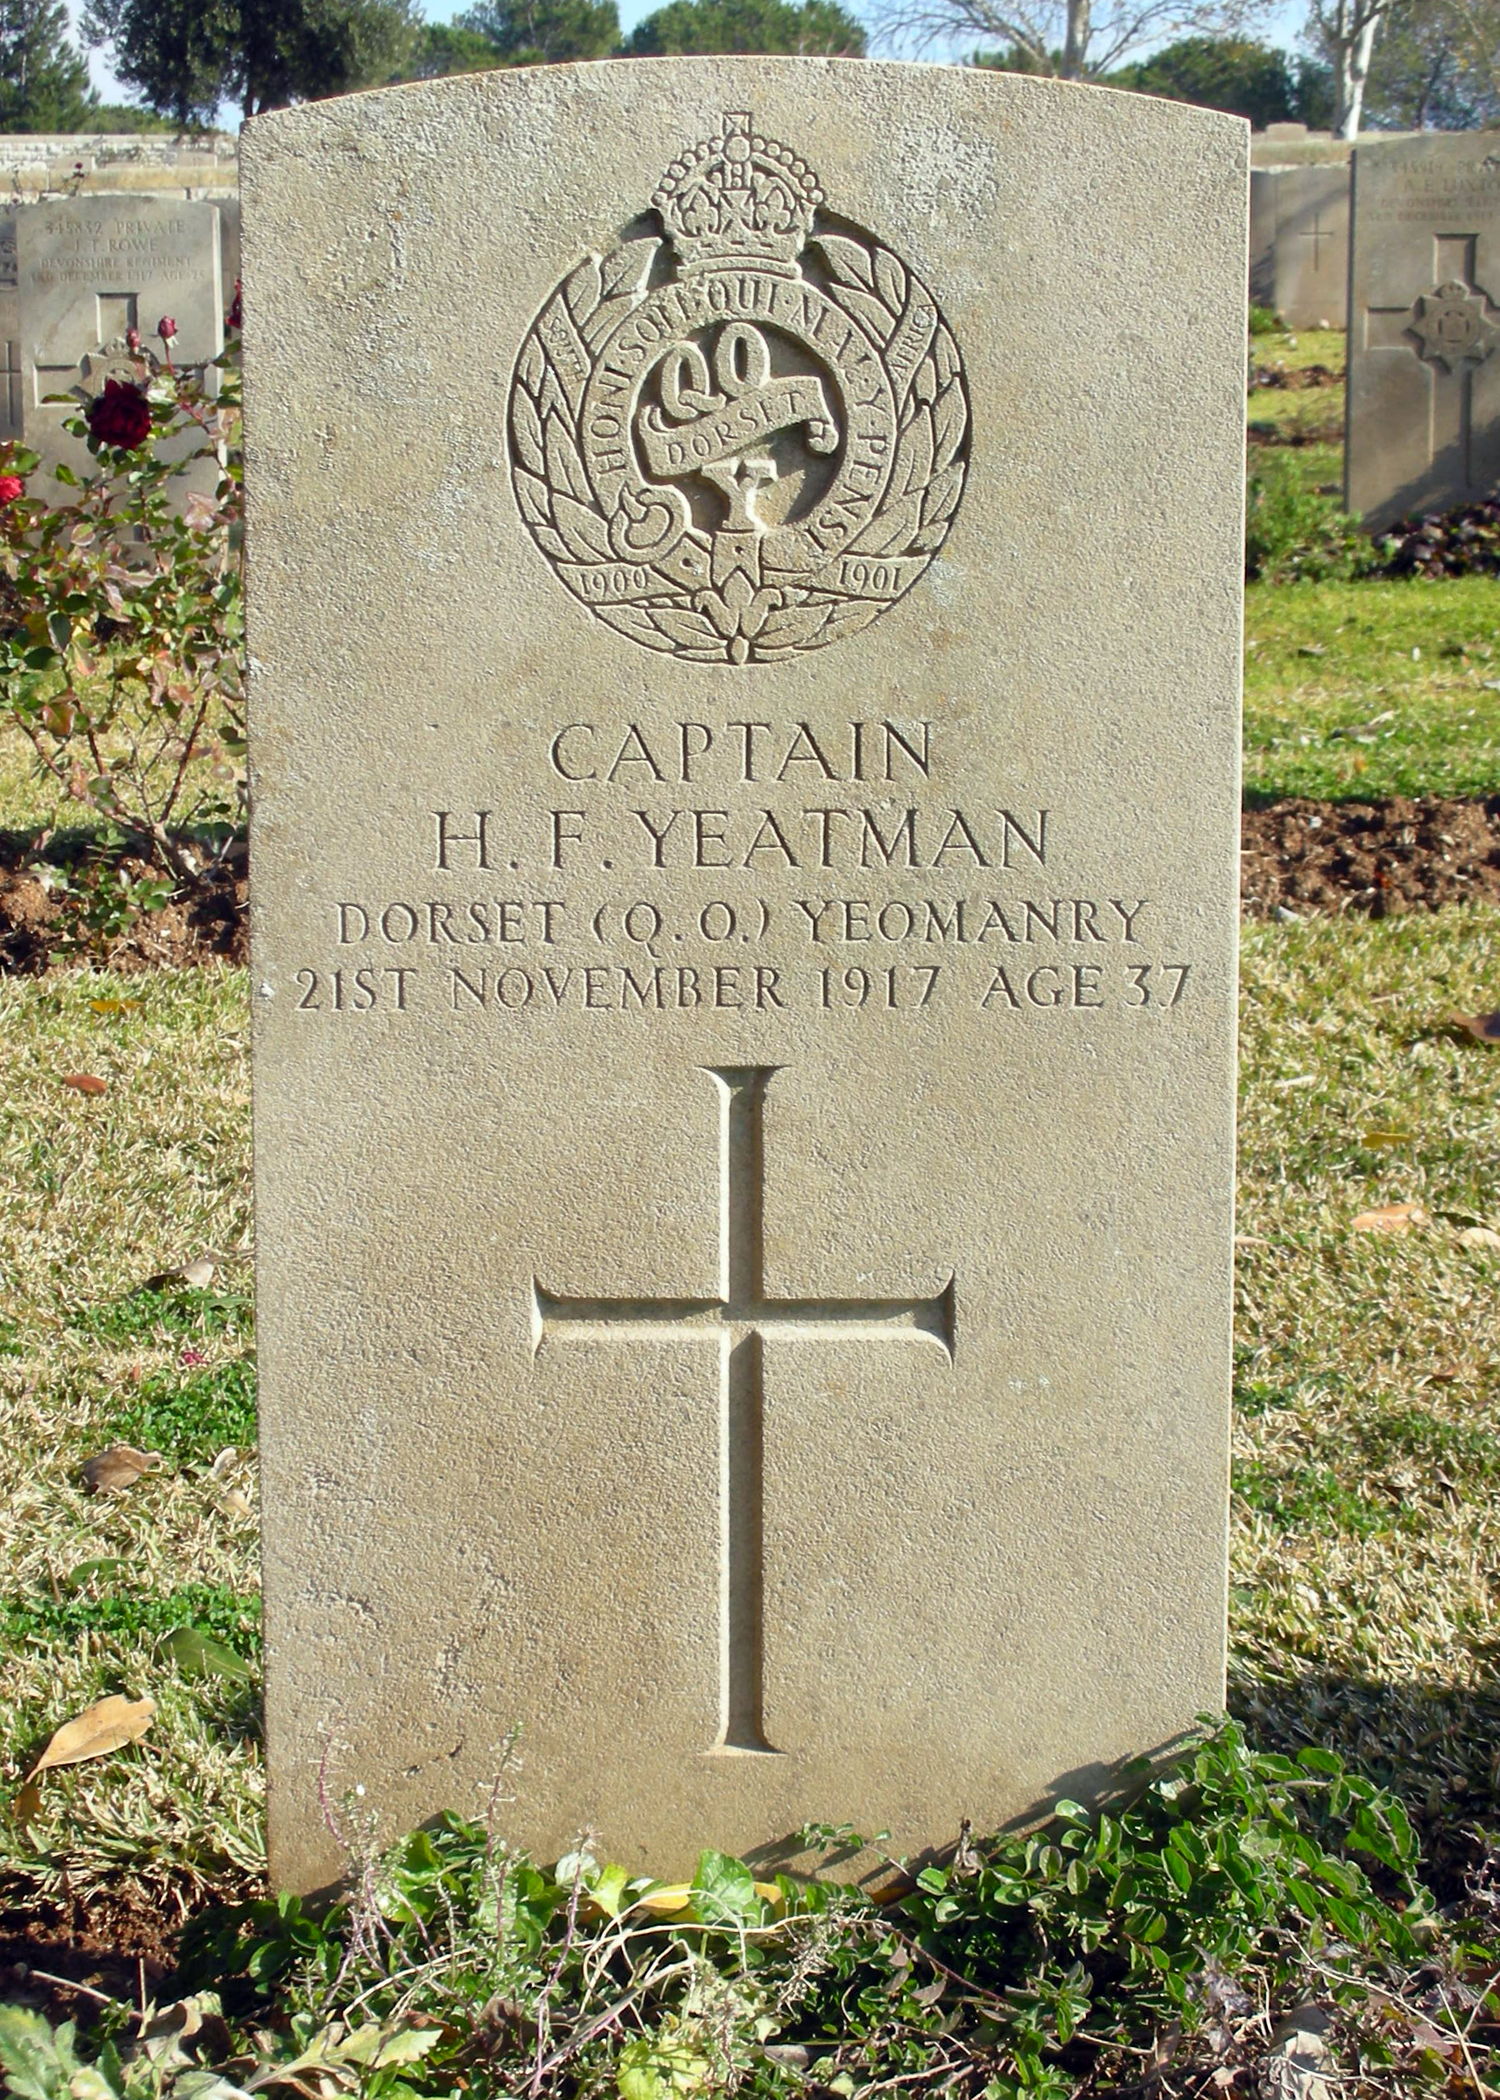
Jerusalem War Cemetery, Israel; Grave E.56
(Photo courtesy of Mr Steve Rogers; photo © The War Graves
Photographic Project).
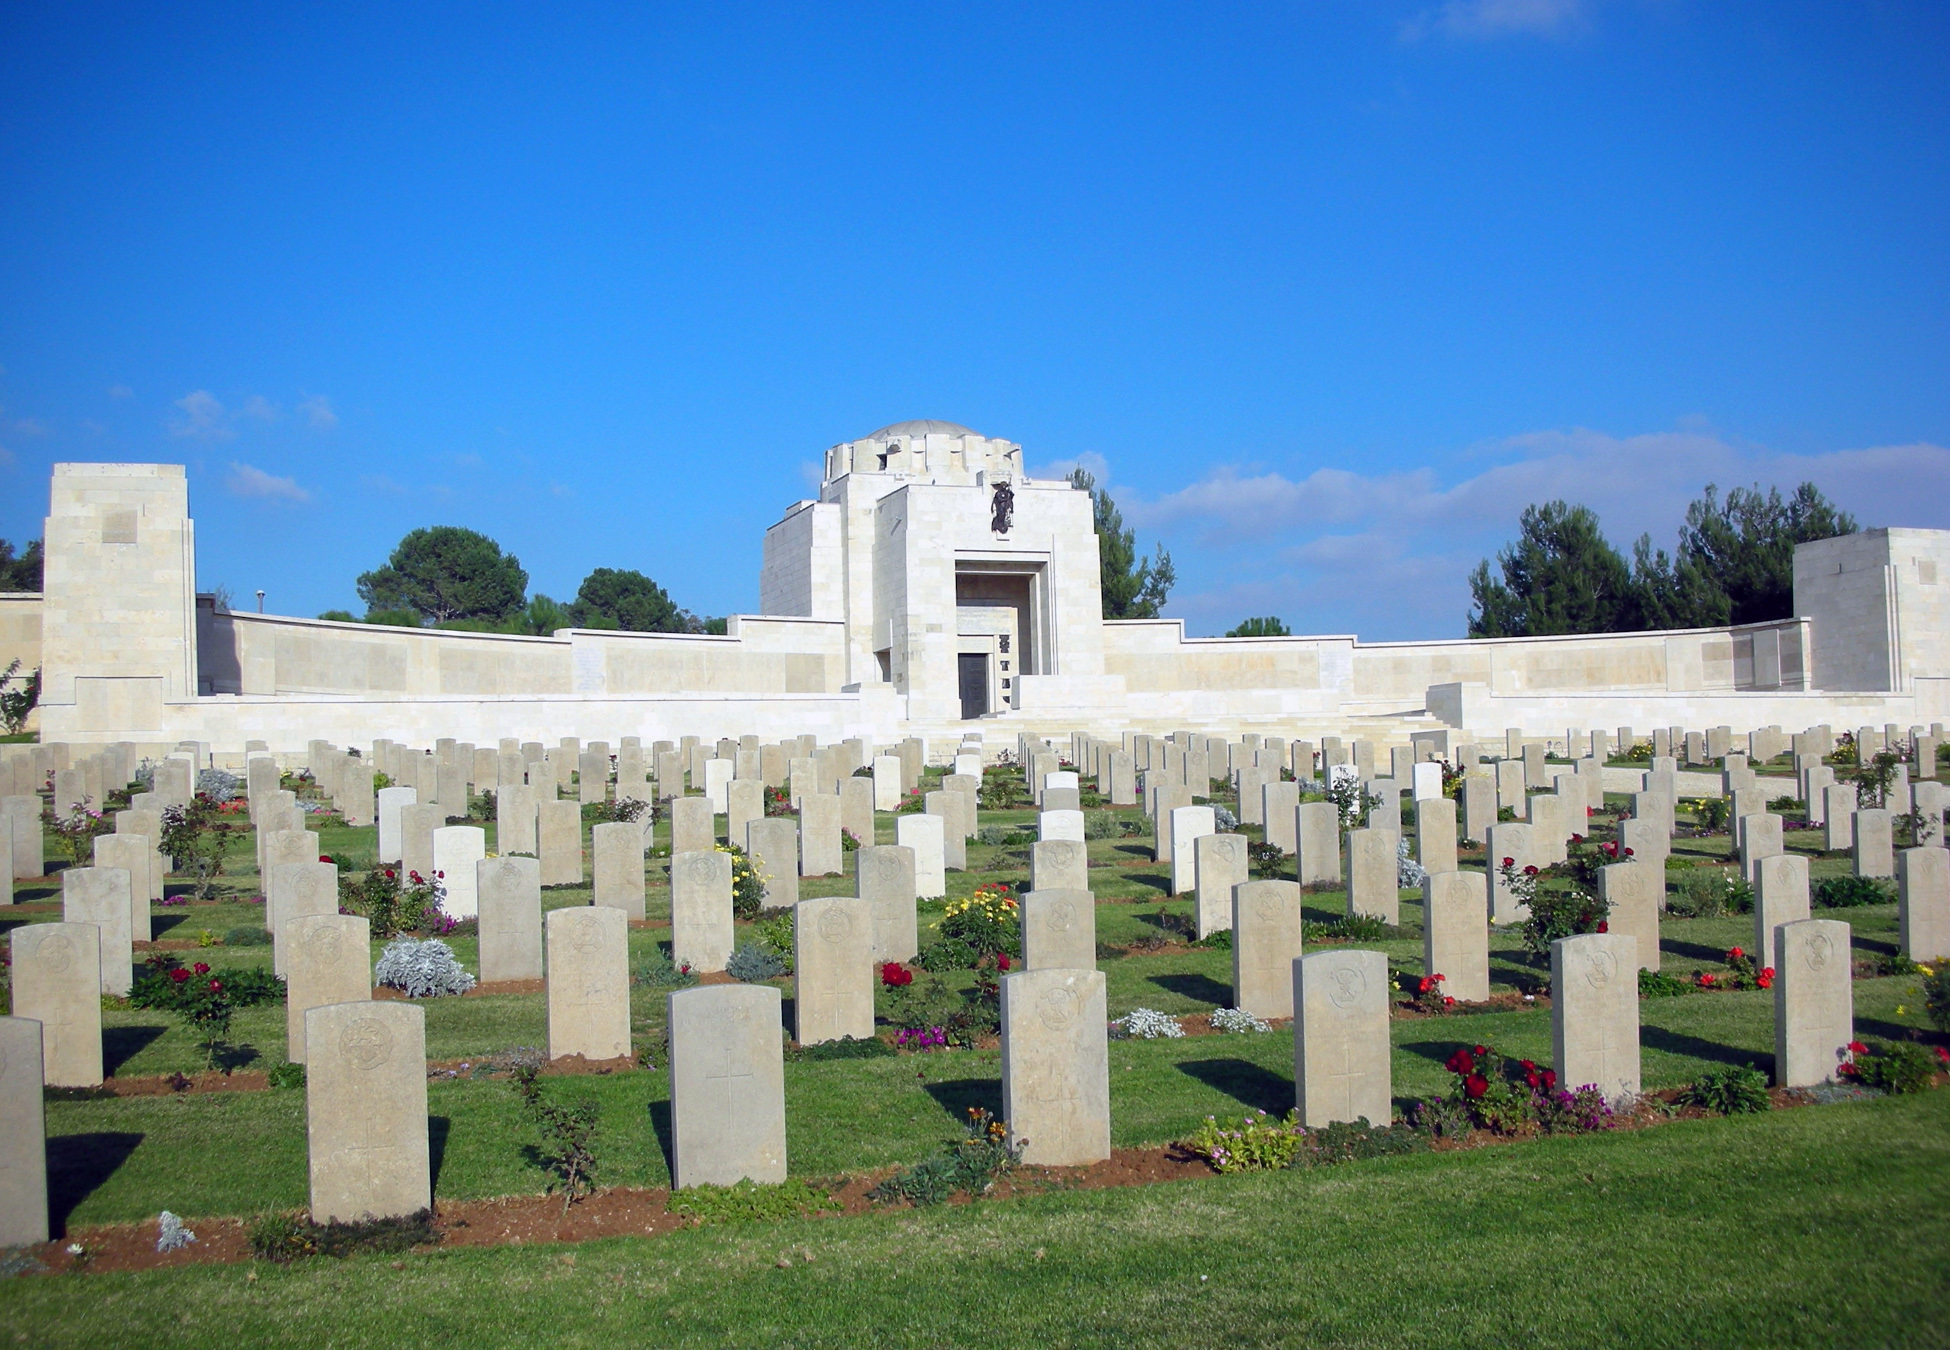
Jerusalem War Cemetery
(Photo courtesy of Mr Steve Rogers; photo © The War Graves
Photographic Project).
Bibliography
For the books and archives referred to here in short form, refer to the Slow Dusk Bibliography and Archival Sources.
Special acknowledgements:
*Roger Ford, Eden to Armageddon: World War I in the Middle East (London: Phoenix [Orion Press], 2010), pp. 302–3, 320, 329–30, 338–53.
*Anthony Bruce, The Last Crusade: The Palestine Campaign in the First World War (London: Thistle Publishing, 2013), pp. 106–32, 150–70, 191–209.
Printed sources:
[Anon.], ‘Death of the Rev. H.H. Yeatman, LL.B., Chairman of the Dorset Quarter Sessions’, Dorset County Chronicle, New Series, Vol. 7, no. 39 (25 April 1861), p. 10.
[Anon.], ‘Obituary: Major-General Yeatmann-Biggs, C.B.’, The Times, no. 35,406 (6 January 1898), p. 3.
[Anon.], ‘Vicar and the Cow’, Portsmouth Evening News, no. 11,414 (4 April 1914), p. 6.
[Anon.], ‘Captain Henry Farr Yeatman’, The Times, no. 41,692 (21 January 1918), p. 8.
Charles Wyville Thompson, Records of the Dorset Yeomanry (Queen’s Own), 1914–1919 (Sherborne: F. Bennett & Co. Ltd, 1921).
Rendall et al., i (1921), p. 148 (photo).
Errington (1922), p. 371.
Leinster-Mackay (1984), pp. 107, 113, 139.
Paul Cotterell, The Railways of Palestine and Israel (Abingdon: Tourret Publishing, 1986).
Philip James and Richard Wilson, ‘The Charge at El Mughar’, Dorset Life, no. 344 (November 2007), pp. 35–8.
Archival sources:
OUA: UR 2/1/37.
OUA (DWM): C.C.J. Webb, Diaries, MS. Eng. misc. e. 1162.
WO95/4293.
WO95/4445.
WO95/4506.
WO95/4566
WO374/77495.
On-line sources:
Wikipedia, ‘Action of Agagia’: https://en.wikipedia.org/wiki/Action_of_Agagia (accessed 27 May 2019).
Australian Light Horse Studies Centre, General Murray’s Despatches, Part 4, letter dated 28 June 1917 to the Secretary of State for War: http://alh-research.tripod.com/Light_Horse/index.blog/2106469/desert-column-dc-general-murrays-despatches-part-4/ (accessed 27 May 2019).
Wikipedia, ‘Australian Mounted Division’: https://en.wikipedia.org/wiki/Australian_Mounted_Division (accessed 27 May 2019).
Wikipedia, ‘Battle of Jerusalem’: https://en.wikipedia.org/wiki/Battle_of_Jerusalem (accessed 27 May 2019).
Wikipedia, ‘Battle of Magdhaba’: https://en.wikipedia.org/wiki/Battle_of_Magdhaba (accessed 27 May 2019).
Wikipedia, ‘Battle of Mughar Ridge’: https://en.wikipedia.org/wiki/Battle_of_Mughar_Ridge (accessed 27 May 2019).
Wikipedia, ‘Battle of Rafa’: https://en.wikipedia.org/wiki/Battle_of_Rafa (accessed 27 May 2019).
Wikipedia, ‘Battle of Romani’, https://en.wikipedia.org/wiki/Battle_of_Romani (accessed 27 May 2019).
Wikipedia, ‘Charge at Huj’: https://en.wikipedia.org/wiki/Charge_at_Huj (accessed 27 May 2019).
Wikipedia, ‘First Battle of Gaza’: https://en.wikipedia.org/wiki/First_Battle_of_Gaza (accessed 27 May 2019).
‘Railway Wonders of the World: Railways in Palestine’ (on-line essay with fine illustrations): https://www.railwaywondersoftheworld.com/palestine.html (accessed 27 May 2019).
Wikipedia, ‘Second Battle of Gaza’: https://en.wikipedia.org/wiki/Second_Battle_of_Gaza (accessed 27 May 2019).
Wikipedia, ‘Stalemate in Southern Palestine’: https://en.wikipedia.org/wiki/Stalemate_in_Southern_Palestine (accessed 27 May 2019).
Wikipedia, ‘Western Frontier Force’: https://en.wikipedia.org/wiki/Western_Frontier_Force (accessed 27 May 2019).
Wikipedia, ‘Third Battle of Gaza’: https://en.wikipedia.org/wiki/Third_Battle_of_Gaza (accessed 4 June 2019).
Wikipedia, ‘Yeomanry Mounted Division’: https://en.wikipedia.org/wiki/Yeomanry_Mounted_Division (accessed 27 May 2019).